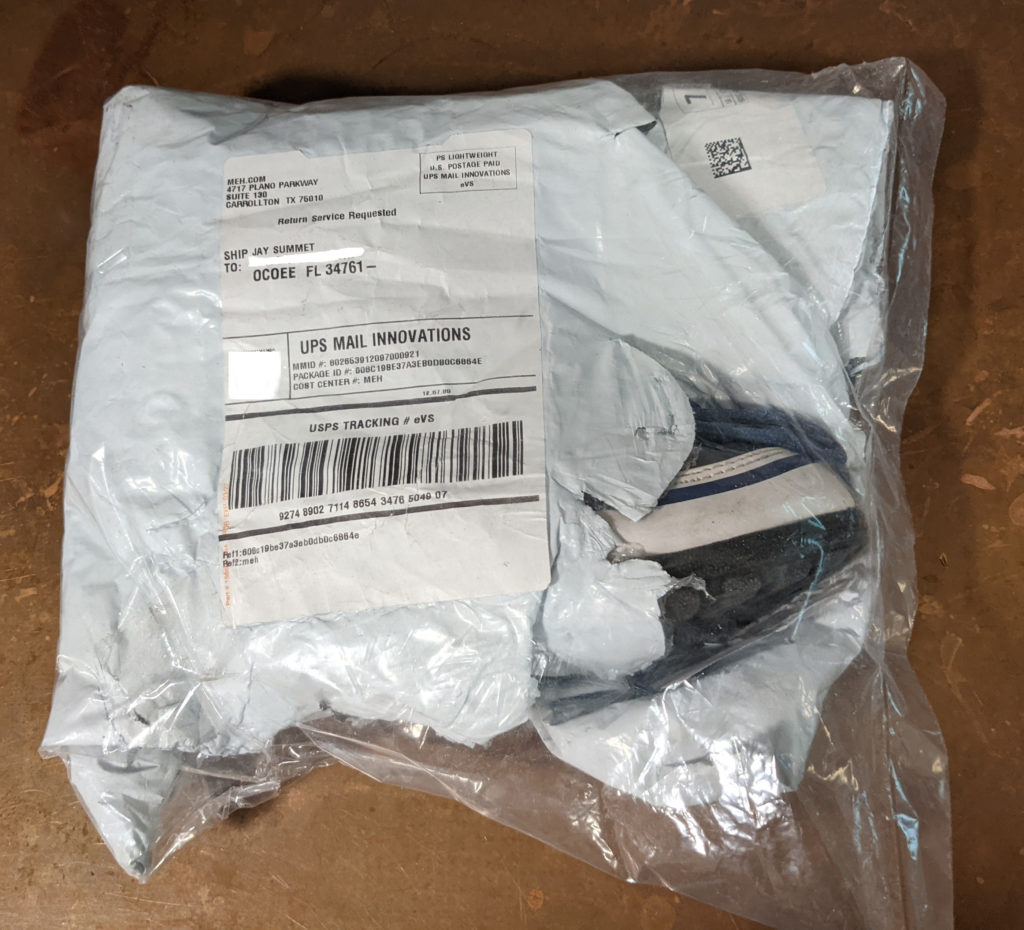

Today I received this package in the mail. It’s never a good thing when the USPS has to tell you they care. Read on to find out how I mailed two books and received back a small child’s boot (the right one).
Author Archives: Jay
Thoughts on Nissan ProPilot Lane Assist (and Intelligent Cruse control)
I had the opportunity to use Nissan’s ProPilot Lane Assist and Intelligent Cruse control in a 2020 Nissan Altima over several drives.
![]()
Here is my review…
Continue reading
How to access your Ubuntu partition if Windows BitLocker has overwritten your GRUB boot loader
If you dual boot a Linux install alongside Windows 10, you may run into an issue where the Windows 10 BitLocker (full disk encryption) panics and refuses to boot your computer. (For example, if you make a change to the BIOS setting, and BitLocker thinks the hard drive has been moved to a different computer.)
The downside to this is that when BitLocker Panics, it may do so before loading the GRUB 2 bootloader, instead popping up a screen asking for your bitlocker “key”. [You DID save that key file in a safe place, right?]
However, even if you do not have access to your BitLocker key, it is usually possible to access (boot into) your Ubuntu partition (If you have a modern UFEI computer) . There are two possible ways to do this. The first is directly from the BitLocker key recovery screen. You can pick to “skip” this drive, and pick an alternate boot option, and one of the options will likely be your Linux/Ubuntu partition (because the UFEI system still knows about the Ubuntu boot system, even if the Windows Bit Locker has over written the Grub master boot record.
Alternatively, on my laptop at least, you could also interrupt the normal boot sequence and pick the “f12 – pick boot device” menu and the Ubuntu/Linux partition was one of the options (along with booting from a USB drive, etc…)
Once you have Ubuntu booted up, a simple:
sudo grub-install
in a terminal should get the GRUB MBR back where it belongs.
Failed Kickstarter projects
Over the years I’ve backed sixty seven kickstarter projects. Seventeen were comics, graphic novels, audio books or magazines. Thirty-nine were hardware/physical product based projects. Five were software development efforts (open source libraries or software products, games….). And there were a few miscellaneous “support this group to do this thing” type of projects, or things where I only pledged $1 or $10 just to lend moral support.
My first failed KickStarter (after 12 successful ones) was CST-01: The World’s Thinnest Watch

The founders were very ambitions, and made great progress, but just didn’t have enough funding for this particular hardware project. I really wish that some company would pick up and run with this idea, because I still want one.
Continue reading
It’s July 2nd 2021, how is Orange County Florida doing with Covid-19?
Well, it’s hard to tell for sure, as the Florida Department of health has stopped issuing daily reports, and has switched to weekly reports. They have also stopped releasing per-county death numbers, among other omissions and simplifications. You may notice that the graph I have to display is simplified this month.

What we do know is that the number of cases per week had been decreasing since mid-April, but in the last two weeks the number of cases per week has started to increase again. On June 1st the 7-day average was 145 cases per day, while as of July 2nd it is 171 cases per day, and the case positivity rate has raised to 5.3%.
Historically, Orange County had a case fatality rate of near 1%, so that would indicate about 1.7 deaths per day, but those numbers are no longer part of the FDOH weekly reports so I have no way of knowing if the case fatality rate has started to drop due to vaccinations of high-risk groups or has increased due to the Delta variant.
We have vaccinated (at least a first dose) 718,103 people (out of a population of 1,457,445, or 49% of the total). If you discount children 12 and under who are not yet eligible for vaccination, Orange County has vaccinated 58% of the eligible population. We vaccinated 65,206 people in the month of June. (Compared to 88,482 in May and 154,176 in April.)
The rate of vaccination has slowed and I expect it to continue to slow, while the total number climbs upward slowly. I expect that fewer than 60 thousand people will be vaccinated in July.
I believe the uptick in case numbers is primarily among the un-vaccinated 51% of the population, due to a combination of the more infectious Delta variant and relaxation of mask usage and social distancing.
[Charts/Numbers used can be found in this open document spreadsheet: orange_county_florida.ods ]
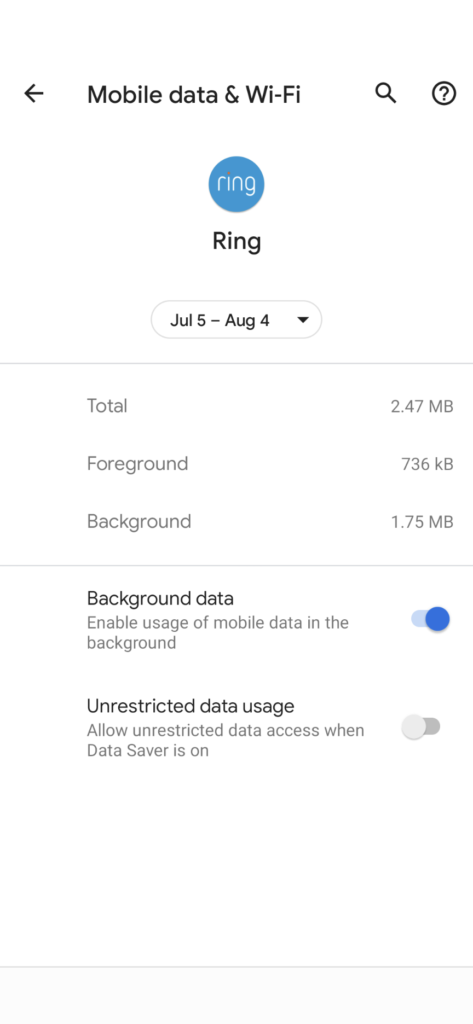
Ring app on Android (3.40.0) suddenly became a background data hog
In the month of May, the ring app cost me $40 (I pay $10 a GB for cellular data).
Having the ability to see what is going on around the house when I am away is worth spending some mobile data on…in March it cost me 54MB, and in April it cost me 318 MB (54 cents and $3.18 cents respectively). However, that is FOREGROUND data, that is actively used when I am streaming data in the app. Sometime after May 5th, the ring app started to download a LOT of background data. In fact, for the May5-June 4th month, I used 91 MB of foreground data, and the ring app used 3.95 GB of background data (that’s $39.50 it cost me).
[Soon after taking these screenshots, I disabled “Background data” for the ring app, which prevented it from using more excessive amounts of (cellular) data and costing me money.
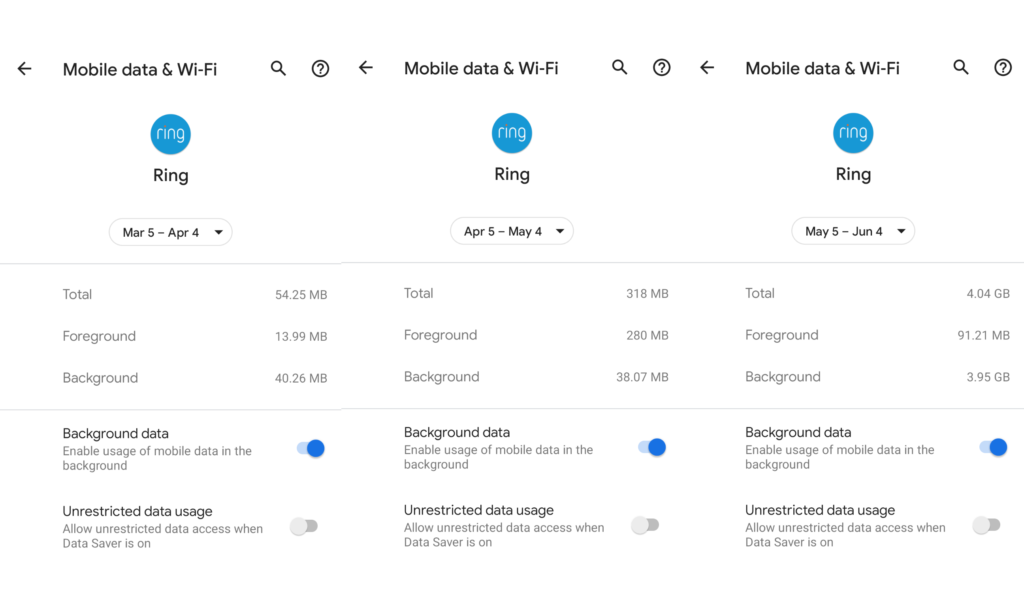
My current version of the ring app is 3.40.0, running on Android 11 on a Pixel 4A phone.
After I got the $40 larger than I was expecting bill in June, I quickly checked to see what was using all of that data, and found that the Ring app had used 1.27 GB of data in only a few days. To put that in perspective, it was using more data than Pokemon GO, which is usually my highest data using application.
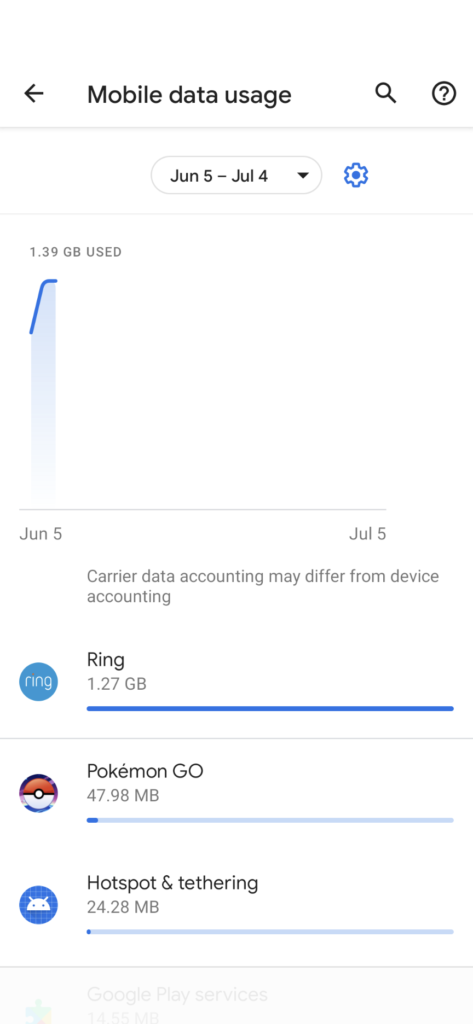
The problem is not limited to cellular data, the ring app has become a massive data hog when on wifi as well (but at least since my wifi connection is not metered, it doesn’t cost me anything). Every so often when I am at home I will use the ring app to watch the video feed from a camera if I get a motion alert and don’t want to get up to look out the window. In March and April this usage amounted to around 1 GB and 1.7 GB of wifi data respectively. But, in May, the ring app used 61 GB of wifi data!
I did not stream more video in May than in previous months, so this is primarily background data usage by the app.
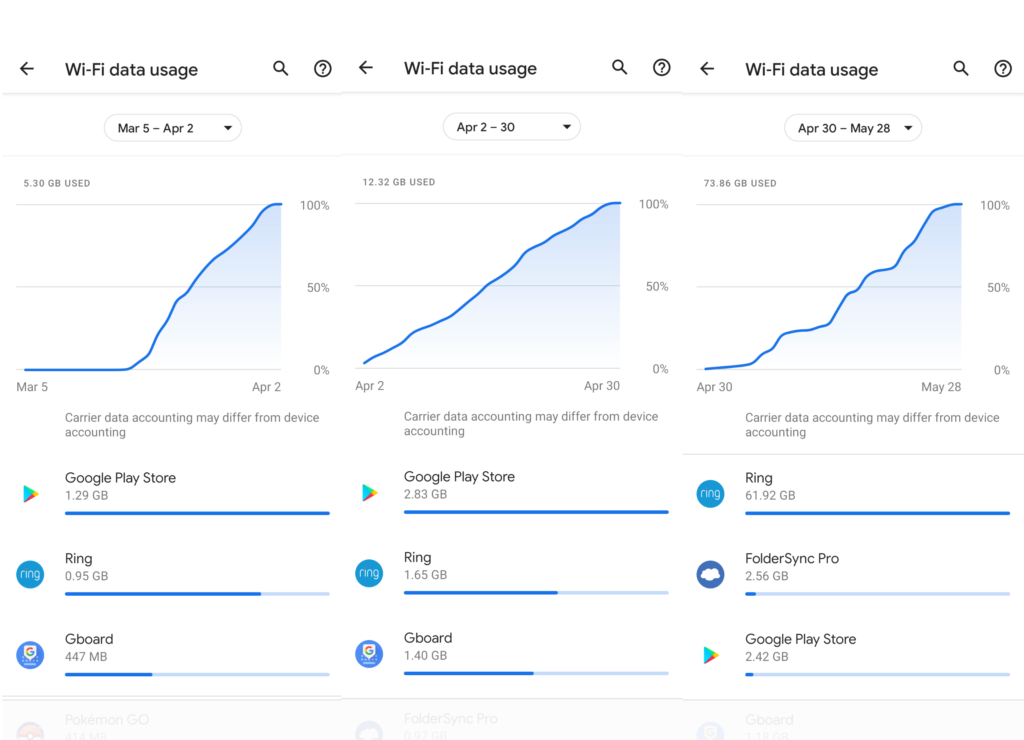
If I had to guess, I suspect that the ring app on android has started automatically downloading videos of motion that occur, EVEN IF THE USER DOES NOT WATCH IT! Perhaps this a feature designed to make the app more responsive if the user selects the notification to view the video stream, but when I talked with technical support, they could not offer any explanation for why this was happening or how to disable the high data usage.
Update – Ring app 3.41.0 appears to have fixed the issue
After the Ring app upgraded to version 3.41.0 on Android, I re-enabled background data and kept a close eye on it for a few days. Including a few times I was away from wifi on cellular data, the data usage was much more reasonable, so it appears that the ring developers have fixed whatever the issue was.
Geeqie image viewer showing only white squares in Ubuntu 21.04
Ubuntu 21.04 uses Wayland (vs X11) and packages a version of the geeqie image viewer that has a bug where this results in displaying white squares instead of images.
https://github.com/BestImageViewer/geeqie/issues/539
The workaround until Ubuntu updates their geeqie package is to go to Edit->Preferences in GeeQie and in the “Image” area enable the option “Use GPU acceleration via the Clutter library (requires restart)”. Once you close and re-start Geeqie, it works! (Assuming your graphics card supports GPU acceleration).
Enabling a maximum battery charge amount (charge threshold) on Lenovo X1 in Ubuntu
Most of the time when using my laptop I am plugged into it’s AC charger. But, I don’t want my lithium-ion battery charged to 100% all of the time, as that is unhealthy for the battery and will lead to it prematurely losing capacity.
My Lenovo X1 Carbon allows you to set a value less than 100 in the:
/sys/class/power_supply/BAT0/charge_control_end_threshold
field and will stop charging your battery if it goes above that amount.
So you can issue a command like the following to prevent your laptop from charging your battery above 80%:
echo "80" | sudo tee /sys/class/power_supply/BAT0/charge_control_end_threshold
(and if you wanted to get fancy, you could tell it to not start charging the battery until it fell below 70% with a command like the following)
echo "70" | sudo tee /sys/class/power_supply/BAT0/charge_control_start_threshold
Then, you would have to unplug the laptop to discharge the battery below 80, and it would just stay there. If you were planning on taking your laptop somewhere without a power cord, you would want to reset this to 100 and fully charge it before you left.
On the X1 carbon with Ubuntu 21.04, I got some “/sys/class/power_supply/BAT0/charge_control_end_threshold: Invalid argument” type errors when trying to set the end amount to a value lower than the current start amount (or the start amount to a value higher than the current end amount). So if you are messing with one, you should probably set the other appropriately before-hand. For example, I use the following commands, in this specific order to limit to 80 (start charging below 70):
echo "70" | sudo tee /sys/class/power_supply/BAT0/charge_control_start_threshold
echo "80" | sudo tee /sys/class/power_supply/BAT0/charge_control_end_threshold
And then to reset to 100 (start charging below 99 or less) I use the commands in this order:
echo "100" | sudo tee /sys/class/power_supply/BAT0/charge_control_end_threshold
echo "99" | sudo tee /sys/class/power_supply/BAT0/charge_control_start_threshold
Using this ordering prevents the Invalid argument errors for me.
The above commands reset the default values, and will not survive a reboot. So if you want them to always be active, you can set up a system service which will fire every time your computer reboots by creating a file in /etc/systemd/system/ called charge-threshold.service that looks like the following:
[Unit]
Description=Set the battery charge threshold
After=multi-user.target
StartLimitBurst=0

[Service]
Type=oneshot
Restart=on-failure
ExecStart=/bin/bash -c 'echo 70 | tee /sys/class/power_supply/BAT0/charge_control_start_threshold; echo 80 | tee /sys/class/power_supply/BAT0/charge_control_end_threshold'

[Install]
WantedBy=multi-user.target
Then enable the service with the following:
X1:/etc/systemd/system$ sudo systemctl enable charge-threshold.service
X1:/etc/systemd/system$ sudo systemctl start charge-threshold.service
Making bc use scale=8 (or any other configuration) every time you start it.
If you use bc (a command line calculator) frequently, you probably want floating point division by default. You can type “scale=8” every time you open it, or you can set up some environment arguments to have that be your default every time you open it.
Create a .bc file in your home directory that includes:
scale=8
Edit a file that is executed every time you log in (such as .bashrc) to include the line:
export BC_ENV_ARGS=~/.bc
Installing Ubuntu 20.04 on Lenovo X1 Carbon (6th gen) with UEFI Secure Boot
Installing Ubuntu 20.04 on a Lenovo X1 Carbon (6th gen) with UEFI Secure boot can be a relatively painless process (If you are using one of the default install options).
When the Ubuntu 20.04 install DVD ISO image detects that your computer booted using UEFI (Secure Boot) it will ask you to provide a password that you can use to install the Ubuntu signed secure boot version of the grub bootloader and authorize it to your BIOS.
After the first reboot, the X1 BIOS brings up a window where instead of booting, you need to move down one menu option and view the new certificate, and then accept/install it. At this point it will ask you to type the password you earlier provided to Ubuntu, and if you are able to do so, it will accept the Ubuntu installed grub bootloader as valid and boot with it. [If you DON’T do this, but try and just boot immediately, it obviously won’t work, and the easiest thing to do is re-do the entire install process, although I’m sure there is some magic you can type with efi tools to give yourself another chance….]
