Mechatronic system for an art project

A local artist asked me if I could build a mechatronic system that would cause “something” to emerge from a piece of art “every so often”. (I’m being vague as it’s not my idea to share.)

I suggested the addition of an PIR (passive infrared)   motion sensor so that the “something” could also react to the approach of people.

I am using a SparkFun Arduino compatible Micro-Pro board, due to its small size and built in USB port which can be used for both programming and power.   In the video and photos, I’m using a small 9g hobby servo, but I have also tested the same circuit with a standard 3003 size servo.   I am powering the SERVO directly from the RAW (red) and GND (black) pins on the MicroPro board (so basically, right from the USB power), and the control line (white) is wired to pin 3 on the board.

The PIR module has three pins. +5V, ground and signal. You provide it with power, and when it detects motion it raises the signal line (it even has a built in pull down resistor on the signal line).   I connected it’s (yellow) signal line to pin 5, and ran it’s black line to GND and red line to the VCC connection on the Micro-pro. (Which is actually tied directly to the USB power supply and doesn’t make use of the onboard regulator when the pro-micro is powered via the USB port.)

The code is a small arduino sketch that will sweep the servo when it detects motion, or every X seconds if it doesn’t detect motion, with a configurable “cool down” period after activating. You can download it here:   mechatronic.ino.zip

The entire circuit can be powered by a USB cell phone charger. I wanted to be able to make it battery powered simply by plugging in a USB powerbank, but unfortunately, the circuit doesn’t draw enough current when not moving the servo to keep most USB Powerbanks from shutting down due to their “low current auto power off” features.
There are a few USB powerbanks on the market which have an “always on” feature for use with low current devices such as webcams, but you can’t just power it with any USB powerbank.


Running our 240 volt Well Pump in a power outage

The last hurricane knocked out our electricity for 3.5 days. (Other people in our neighborhood were without power for 6+ days). I have a 120 volt inverter that I used to power our fridge, microwave and internet, but our well pump requires 240 volts.   It was really annoying to have to transfer water from our tub to the toilet tank to flush, and not be able to wash our hands at the sink or get water from the tap when we wanted to.

My wife has given me a $1,000 budget to expand our backup system so that we can run the well pump in power outages, and the first step is to figure out the actual power draw of the well pump.


The pump is powered off of a 20 amp circuit, so the maximum draw is 240v * 20A = 4,800 watts. I measured the actual continuous draw when the pump is running at just under 10 amps, or 10 * 240 = 2,400 watts continuous.   I will probably need to purchase an inverter with a surge rating of twice that to support the inductive surge the pump motor is likely to draw when it first turns on.

I hooked up an energy monitor to the pump circuit and monitored it for a few weeks. The energy monitor estimates that the well pump uses between 6-8 kWh of power over the course of a month, so I will only need 1-2 kWh of battery capacity to be able to run it for several days.

Continue reading

First 5 months report & payback calculations – Grid Tie Solar System

Five months ago we turned on our new grid tie solar system and started to produce power.

Component Failures & Warranty Service
In the first five months, we have had two components replaced under warranty. The first was one of the 36 SolarEdge DC optimizer units (A $75 component with a 25 year warranty) that are mounted under each of the solar panels. The Solar Edge monitoring system had flagged that one of the optimizers was not reporting (and presumably also not producing power) and sent a message to our installer (3Guys Solar). They called me (before I even knew anything was wrong) and let me know they would be sending a crew out to climb up on the roof to replace it the next day, so that particular panel was down for only 2 days. The other 35 panels continued to produce power.   The crew said that they sometimes have to replace several optimizers on a house, and some houses never have any fail.

The second component to fail was the system’s main DC->AC inverter, a 10kW Solar Edge grid tie inverter (a $2,000 component with a 12 year warranty). On October 23rd I noticed on the phone monitoring app that we had no power produced, so that night I went out and rebooted the inverter.   The next day, 3Guys solar called me to report that they had received a fault code from the Inverter via the Solar Edge monitoring system and were working with Solar Edge to try and resolve the fault. The following day they called again to tell me that they would need to replace the inverter under warranty. Unfortunately, it took close to two weeks to receive the replacement unit from Solar Edge, so we were not producing solar power again until the 7th of November.

It was concerning to have the inverter   fail within the first three months, but it is covered by a 12 year warranty, was replaced within two weeks and we haven’t had any problems since. 3 Guys Solar also sent us a check for $95 to cover the cost of the energy generation lost during this period. This is a limited time program, and was not part of their original install contract, so the check was not expected but appreciated. (By my estimates they overpaid us by 20-30$ for the energy the system wasn’t producing while the inverter was down.) The warranty coverage by 3Guys Solar (the installer) and Solar Edge (equipment manufacturer) left nothing to be desired.   My expectation is that with solid state electrical equipment like this, most of the failures that are going to happen will happen early in the life-cycle (or very late in the lifecycle), and I hope the equipment will be stable now that we’ve gotten the early failures out of the way.

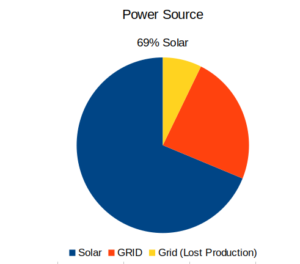
Power Generated & Usage

In this 5 month period, we generated 5096 kWh of solar power, and used 7405 kWh of electricity (paying for 2309 kWh from Duke, at a cost of $337.44 (-$95 credit from 3GS lowers this to $242.44)).


In the same 5 month period last year, we used and paid for 7378 kWh of electricity from Duke, (costing $977.81) so our usage appears to be closely correlated to before we had the solar system.

By averaging production between the week before and the week after, I estimate that in the 15 day period our inverter was down we should have produced an additional 540 kWh of power ( $70 of electricity at 13 cents per kWh). So without the inverter failure, we would have produced around 5636 of the 7405 kWh we used, or 76% of our total electricity usage via solar. [With the inverter failure, we were only at 69% of our power from the sun.] Our goal was to produce 80-90% of our electricity from the sun, so these numbers are close to our goal, and I hope that the sunny spring (and no more inverter failures) will raise our percentage.

From a cost perspective, because Duke Energy has a fixed customer charge, our solar cost savings is lower than percentage of power generated, and was a savings of between 65% to 75% off our electric bill.

Seasonal Effects on Future Predictions

Estimates made with less than a full year of solar data are going to be wildly inaccurate. The Aug->January time period is cooler than other months, so our AC usage will be lower, but there is also less solar production in the winter, meaning that our generation will be lower as well.   The following numbers are a guess, and are much less accurate than those I hope to calculate after the system has been working for a full year.

Over the same 5 month period last year, the solar system has saved us between $640 and $735 (depending upon if you add in the non-contractually obligated 95$ check that 3Guys Solar sent us).   This equates to an estimated payback period of   11 to 12.75 years.   (The 1.75 years, or 14% difference in payback time is driven by the 13% difference in cost savings that $95 check equates to over the 5 month period.)

If it turns out that our solar system produces a much higher percentage of our usage in the sunny spring months, or if Duke Energy raises their rates, this payback period could drop.   If we use too much AC in the summer, or Duke lowers their rates (?!?!) the payback period could increase. I’ll feel much more confident about the estimate after collecting a full year of usage and generation data. (And even then, solar generation and electrical usage can still vary year to year with the weather.)

Update: Read the 1 year report for a better set of annual numbers.

Megatree Ball Topper

For Christmas 2017, I built a computer controlled RGB Pixel LED megatree around a pine tree in my yard. For Christmas 2018, I built a 48″ outside diameter “ball” topper for the tree. (It looks better when it’s pulled 20′ up the tree, and lit up at night…)

This was the first “large scale” project that made use of my Maslow CNC router to cut out a large number of parts (which took many hours) that bolt together in such a way that each individual part can fit into a 27 gallon tote for storage.

I think it actually took longer to cut out all of the parts than to paint them, but painting them with exterior house paint for some weather protection also took a bit of effort.

If you want my OpenSCAD files to make your own version, you can find it in this zip file:
topperOpenscad

And here is a video that shows off some of the animations I sequenced for 2018:

Orlando OTA Channels – 2018

A list of the digital over the air (OTA) channels I can pick up from the west side of Orlando.

  • 2_1 – WESH-DT (NBC)
    • 2_2 – Me TV
  • 18_1 – WKCF-DT (CW)
    • 18_2 – Justice
    • 18_3 – estrell
  • 35_1 – WOFL-DT (FOX)
    • 35_2 – Light
  • 24_1 – WUCF-DT (PBS)
    • 24_2 – Create
    • 24_3 – Kids
    • 24_4 – NHK
    • 24_5 – World
  • 45_1 – WTGL-DT (IND?)
  • 6_1 – WKMD-DT (CBS)
    • 6_2 – Cozi TV
    • 6_3 – Decades
  • 27_1 – WRDQ-DT (IND?)
    • 27_2 – Antenna
    • 27_4 – GRIT TV
  • 31_2 – WTMO-SD (Telemundo)
  • 68_1 – WEFS-HD (   far away station?)
    • 68_2 WEFS-CL
    • 68_3 WEFS-NS
    • 68_4 WEFS-FL
  • 15_1 – WDSC-HD (far away station?)
    • 15_2 – WDSC-ED
    • 15_3 – WDSC-WV
  • 9_1 – WFTV-HD ( ABC )
    • 9_2 – Laff
    • 9_3 – Escape
  • 55_1 – WACX-D1 (REL IND?)
    • 55_2 – D2
    • 55_3 – D3
    • 55_4 – D4
    • 55_5 – D5
    • 55_6 – D6
    • 55_7 – D7
    • 55_8 – D8
    • 55_9 – D9
    • 55_10 – D10
    • 55_11 – D11
  • 65_1 – WRBW-DT ( My TV)
    • 65_2 – Movies!
    • 65_3 – H&I
    • 65_4 – BUZZR
  • 52_1 – TBN HD
    • 52_2 – HILLSNG
    • 52_3 – COMBO
    • 52_4 – Enlace
    • 52_5 – Salsa

Optimizing Pokemon Go Gift Exchanges / XP from Friendship levels

The addition of Trading / Friends / Gifts to Pokemon Go has added an extra level of play (work?) to the game. These are my thoughts on how to optimize friendship and gift sending and opening.

My starting assumptions:

  1. The goal of exchanging gifts is to build up friendship levels as quickly as possible so that Pokemon trades cost less stardust. [I am explicitly rejecting the idea that the primary reason to open gifts is to restock items.]
  2. You have not yet reached level 40 (or still care about building up your XP) and are willing to use Lucky Eggs to increase the XP you receive from friendship level increases.   [If you don’t care about XP, optimizing Pokemon gift exchanges becomes much easier.]


The Simple System (for Level 40 Players)

Continue reading

ILLuminArt 2018 Tornado

This is “Florida Weather” (a.k.a. The Tornado) an entry to the 2018 ILLuminArt show by Florida Sculpture Guild members Amy Wieck, Louise Buhrmann and Cathy Farrar. My only contribution was the computer controlled lights to add “Lightning” which can be seen in the video below:

They won both 2nd place and the People’s Choice Award.

8×8 floating dock section


I bought a 8×16 floating dock for $100 delivered. The main reason it was so cheap was that they had originally used Melamine covered particle board for the decking, with predictable results.

But the pressure treated 2×6’s and foam floats were in relatively good shape, so I bought 4 brand new 2×6’s to have nice new lumber on the outside, and built my own 8×8 floating dock.

I used 7 2×6’s total (4 new ones and the 3 interior ones salvaged from the original dock) to build the frame around the foam floats, wheeled it down to the lake, and then screwed in 19 composite deck boards.

And here is the finished product (before adding hardware to fix it in place with pipe floats, bumpers, solar lights, etc…)


The total cost was about a dollar per pound of dock. The composite deck boards were the heaviest and most expensive single item, although the hardware to hold the dock on pipes and attach it to other dock sections will also add significantly to the cost.

Item Price Weight
Old Dock parts w/ Delivery 50 100
4 (new) + 3 (used) 2×6 -ground contact PT 23.52 117
3x tubes of black calk 14.34 2
deck screws 3.5″ 8.05 1
19 composite Deck Boards 252.7 307
2 lb deck screws (1 5/8″) 16.08 2
2x TommyDocks floating dock pipe guide (with pipe & augers, not included in the weight) 111.9 4
4x Solar Pathway Lights 57.95 1
Totals (Cost / Weight) $534.32 534lb

Grid-Tie Solar System Pricing in Orlando – My shopping experience

We recently hired 3 Guys Solar to install a 10.4 kW grid-tie solar system on our house. They installed 36 Axitec 290 watt mono panels with DC Optimizers on Iron Ridge racking, and a 10 kW Solar Edge grid-tie inverter.   Our final price was $2.409 per installed watt (Summer 2018).     I say final price, because we had a wide range of quotes from multiple companies, and several companies lowered their initial quote upon seeing quotes from the other companies. Our home,   with a new asphalt shingle, south facing roof with plenty of room for panels was about as simple and optimal as you can get for a solar install, so if your roof is more complicated (tile, metal, gables, vents, skylights etc) you can expect to pay a bit more. Read on for the full story of how we got to this final price.

Continue reading

Ego 21″³ mower (LM2100SP) 2nd self propel motor failure & repair report

No, this post isn’t an accidental duplicate of this post from last year. Yes, the self propel unit on my 21″ SP Ego lawn mower failed a second time. (This is 9 months after it was replaced under warranty from the first failure, which occurred around month 4 of ownership, so this failed self propel motor lasted twice as long as the first one.)

However,   I’m quite pleased with Ego’s warranty service compared to the last time when I had to take the mower to Home Depot’s service department (who kept it for 5 weeks).

This time when I called Ego’s customer support number, I only had a seven minute hold time before talking to a person, and the customer support representative said that they would send me out a new replacement mower, arriving in 5-10 business days. [I was instructed to remove the serial number sticker and take the defective mower back to home depot “for recycling”.]

I have read many accounts on Ego’s customer web forums of other self propel units failing, so they may have had a bad batch of mowers go out and are now being more pro-active about replacing them. Alternatively, maybe I’m getting a replacement mower shipped out quickly because this is the second issue I’ve had. Regardless, receiving a working replacement in 5-10 days is much better than taking 5 weeks for a repair.     I’m still going to have to push my mower to mow the lawn (and it’s a big lawn, so this is more exercise than I am looking for….) but at least I could use the defective mower as a push mower until the replacement arrived and didn’t have to hire a lawn service while it’s in the shop.

The new mower arrived 11 business days after my phone call (it would have been 10, except UPS had a delivery exception and delayed it over a weekend, which meant I had to push the old mower around one more time.

After using the new mower with its super quiet and silky smooth self propel, I can say that the self propel unit that home depot repaired/replaced had many signs of problems before it finally gave up the ghost. First, it was louder than the mower itself. Second, it didn’t have enough power to fully propel the mower up a slight incline. Third, every time the mower went into overdrive due to thick grass, the self propel would slow down. These issues were either there from the time I got the mower back from Home Depot, or they started and got worse so gradually that I hadn’t taken note of them, but after using the new mower, it became obvious that I should have known my self propel unit was not working the way it was supposed to. On the new mower the self propel has plenty of power to move up a grade at the same speed it moves on flat ground, it makes less noise than the blade mower, and it doesn’t slow down when the blade mower goes into “overdrive” cutting thick grass.


Update: Ego has started to produce updated 21″ SP models that have an updated self propel unit that matches that found in their dual battery (premium) mowers. Look for a picture of a phone on the box (see this video for details: https://www.youtube.com/watch?v=JtLkT5X4MQw )

2nd Update: My self propel unit failed a 3rd time, but this time Ego replaced the mower with one that has a different looking SP unit, so I’m hopefully I got the improved version!