Playing a USB midi keyboard on Ubuntu Linux

I purchased a USB MIDI keyboard (the Alesis Q25) for use with my musical Tesla coil, but also wanted to use it to learn to play the keyboard/piano when traveling with my laptop.

The MIDI keyboard has no synthesizer of it’s own, so you need a computer that will take the MIDI data stream and play (synthesize) the actual sounds of a piano or other instrument so that you can “hear” what you are playing.

There are many pieces of complicated software on Linux that will allow you to compose music with a MIDI keyboard, but all I wanted was the ability to hit a key on my keyboard and have it make music.

The easiest set of software I found to do this was vmpk (virtual midi piano keyboard) combined with Qsynth (a GUI interface to fluidsynth). I started up qsynth and vmpk at the same time. Then I used the “edit->connections” menu on vmpk to set my MIDI keyboard as the incomming connection, and the “FLUID Synth (Qsynth1)” as the output connection.

To set up qsynth I hit the “setup” button and then in the MIDI tab selected the “alsa_seq” as the MIDI Driver and “qsynth” as the MIDI Client Name ID (ALSA/CoreMidi).
I also enabled the soundfront from the /user/share/sounds/sf2 folder.
I don’t know why I had to use vmpk to make this linkup between the keyboard and Qsynth, but so far I haven’t found an easy way to tell Qsynth to just listen to midi events from the keyboard directly. On the plus side, you can use the virtual keyboard that vmpk displays on the screen to play notes if you don’t actually have a physical USB MIDI keyboard.

OneTesla O-scope traces

I have reduced my primary to 5 turns, and using the standard 0.068 MFD tank cap, this is the general shape of my oneTesla output waveform (as captured by a scope probe hanging in the air about 3 feet away from the coil):
Screen Capture

As you can see, the primary rings up and then the secondary oscillates for quite a while afterwards.

The next three traces are running the coil at a very low power level. Depending upon where I measure between peaks on the trace, I get different frequencies:

Screen Capture
277 kHz

Screen Capture
294 kHz

Screen Capture

17.80 uS between five peaks, or 1 / (3.56 / 1000000) = 280 kHz

As the 280 is between the 277 and the 294, we’ll just say that my primary has a resonant frequency of 280 kHz, when at low power.

Next, I turned the power up a bit (around 1/3 of the way up) and got the following two measurements:

Screen Capture
263 kHz

Screen Capture
18.40 uS for 5 peaks, or 1 / (3.68 / 1000000) = 272 kHz

So my primary resonance is somewhere between 263 and 294 depending upon how I measure it, with a value of 272-280 looking to be a reasonable average.

Surprisingly, my secondary resonance measurements agreed with themselves a bit better. Here is the low power trace:
Screen Capture

And the “Mid Power” trace.
Screen Capture
(You can see the primary ringing extending out so that it becomes visible in the trace…)

In both cases, I measured 15.20 uS between 5 peaks or
1 / (3.04 / 1000000) = 329 kHz

So my ratio is currently 329 / 280 or 1.175 ( Secondary 17-18% higher than my primary).

oneTesla top breakout point for my musical Tesla coil

Since I’ll be primarily using my oneTesla to play music, I wanted a top facing breakout (so the sparks will shoot up, instead of out to the side). Also, I wanted something more professional looking than a stick of metal taped to the top of the toroid. Here is the final product on the top of my toroid:

You can visit [ this post ] to see a video of it in action.
I used the lathe to get the general shape I wanted:
on_lathe

Then turned it to even up the 15 degree angle:

And this is my original 1″ diameter aluminum stock. I tapped it for the 14-20 bolt on the top of my Tesla coil that normally has a wing nut to hold the stamped toroid together, so the whole thing just screws onto the top.

Turning custom extruder parts

finished_heatsinc
jays_parts_in_front

This is my new extruder hot end. After enclosing my printer with an insulated box, I decided that I needed to drop more heat before the plastic entry side of the end of the barrel. I accomplished this by turning an extra long barrel out of brass, and a small heatsink out of aluminum to go between the heater and the Groove Mount.

You can see the barrel compared to the original part here:
original_and_replacement_part

The barrel was straightforward to turn out of a piece of 1/4″ hex stock. I put the threads on with a metric M6x1 die.
turned_hex

The HeatSink took more time, mostly because I had to cut the fins out of a 1″ diameter rod quite deeply with a cut-off tool.
inLathe1

I compressed the several hours of work on the heatsink down into a six minute video below:

CaseModding my 3D printer’s insulated cover

After building an insulated cover for my 3D printer, I decided that I needed to put some lights inside. This allows me to see how the print job is progressing, both via the porthole, and via the interior webcam. Because green surplus neon tubes for computer cases are inexpensive and take 12 volts, I riced up the cover with two green neon tubes. The color complements the light teal of the foam insulation nicely, and gives my Garage Laboratory an evil green glow at night.
riced_cover_neon_lights

Insulated cover for my RepRap

lid_open
My 3D printer lives in the garage. I use it to print ABS plastic, so the smell needs to be out there. However, as my garage is unheated, I have problems with ABS prints warping and cracking, especially during the winter due to the cold air around the part as it is printed. To solve this problem (and get better performance even in the summer) I built an insulated cover for my 3D printer.

lid_closed

I cut a round viewport in the door that is covered by shrink fit window insulation plastic. Continue reading

Building a Monster UPS

(Or, “My UPS is bigger than yours, Na Nah Na Na Na!”)
Most consumer grade Uninterruptable Power Supplies (UPS) are designed to give you just enough time to save your work and shut down your computer, and run off of a 5 to 7 Amp Hour 12 volt battery (and because they are discharged so quickly, the pieukert effect means that you don’t get anywhere near the full 5-7 amp hour capacity).

The battery core of my UPS is a pair of two six volt GC2 deep cycle golf cart batteries rated at a 208 Ah capacity. Running a standard computer system, they will be well within their 20 hour rate curves, but as they can deliver 75 amps for 100+ minutes they can also run higher draw appliances such as a toaster oven or refrigerator if needed.
batteries

These are the same type of batteries as power my electric pickup truck, so I have a ready supply of halfway-used batteries. They can also act as a backup battery for my truck if one of the traction pack batteries need replacing. In addition, if we have a freak ice storm that takes out power for multiple days, I can swap batteries into the UPS from my truck and keep the refrigerator and some lights running for a week.

Of course, to run a 15 amp (120 volt) appliance off of a 12 volt supply you need something better than a $50 harbor freight inverter. Meet the Xantex Freedom 458, an inverter/charger originally designed for RV use. It provides dual 20 and 15 amp AC circuits plus a battery charger and AC pass-through from shore power when available. This means that it operates like a true UPS, running on grid current (shore power) and keeping the batteries charged when available, and immediately switching over to inverter power from the battery bank if the grid goes down.

xantrex_freedom458

I used AWG 2 gauge cables to connect the batteries to the inverter (because I couldn’t buy AWG 1 at Walmart) which should be good to at least 180 amps continuous (at 12 volts, this is the 2000 watt max rating of the inverter, well more than I plan on running through the system.)

The most time consuming part of assembling the UPS was building an enclosure out of 2×4’s and plywood. (4x 28″, 4x 16″, 4x 9″, plus 2 shelves of 16×14.5″ and 1 top of 16×17.5″). I put the batteries on top under a removable top cover so that every few months I can unscrew a few wood screws, lift up the top, and easily water the batteries. If I expand the system to use more than 2 batteries I’ll probably invest in a tube based battery watering system.
super_UPS_plan build3_4x3

I also added casters to the bottom so that I can roll the UPS around to anywhere I want it (assuming it’s on the concrete garage floor, parking pad, driveway, or walkway).

Electric Pickup Truck: Cost of Ownership

ev_operating_costs
We have owned an electric S-10 pickup truck for the last 1008 days (2.75 years) and used it as a daily driver. It was driven most frequently to the MARTA station, a 4 mile round trip commute, but also made trips to hardware stores, the Georgia Tech Campus, and to the homes of various people who were selling furniture or other larger items on craigslist. It uses twenty (six volt lead acid) golf cart batteries for its traction pack, and they have gradually lost capacity. When brand new, I would take the truck on 20 to 25 mile trips without stressing the battery pack. Recently however, the absolute maximum range of the truck had dropped to 12-14 miles and if you actually drove it 14 miles you could watch individual batteries hitting their absolute end of their state of charge. Although it could have functioned as a “Get to the MARTA station” vehicle for another year (or two?) I decided it was time to replace the pack to be able to comfortably go to the hardware store or make an extra emergency trip without worry. I have placed 685 charge cycles on the pack, which is in line with the lifespan for lead acid golf cart batteries.

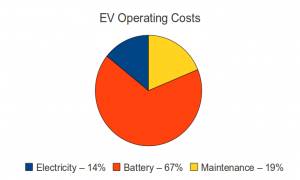
The replacement pack cost $2,171 (I gave back all but one of the used batteries for the core charge), which gives me the final piece of information needed to calculate the total cost of ownership over the last 1008 days. We spent $464 on electricity (estimated at $0.11 a KWH), $610 on maintenance, and the previously mentioned $2,171 on batteries. Obviously, the battery pack is the large cost here. In fact, the electricity cost is very small on a monthly basis, and was never more than 10-15% of our total KWH usage.

We drove a total of 4,861 miles in that timeframe, giving a cost of $0.66 a mile or $3.22 a day. This does not take into account licensing and insurance, but those costs would be exactly the same for an internal combustion engine (ICE) vehicle. If the S-10 were an ICE model, it would probably get around 20 mpg, so the fuel cost (estimating $3.50 for a gallon of gas) would be $0.175 per mile. So for 4,861 miles it would take 242.55 gallons of gas or a fuel cost of $849. This would imply that an ICE vehcile would have to have a maintenance cost of $2400 to get the same per mile cost of ownership as my EV.

Although ICE vehicles are more expensive to maintain, unless something major on the engine exploded, it looks like my hypotheical ICE S10 pickup wins the straight up cost comparison. Of course, I never had to drive out of my way to stop at a gas station, and there is the matter of 242.5 gallons of gas I didn’t use. (the lead and plastic in my batteries goes back to the factory to make new batteries)

In the interest of full disclosure, my first pack of batteries was purchased at a Sam’s Club for $1,800, so my true cost per mile is closer to $0.59. (But I used the pack replacement cost as an estimate for the cost of ownership for my next pack.)

I am hopefull that my 2nd pack (from Interstate batteries) will last longer, either because Interstate sells better batteries, or because I have learned how to care for them better. (Although I don’t think I did anything horrible to murder the first pack…)