Megatree: Materials & Costs

So, what do you need to build a large digitally color controlled LED outdoor Christmas tree display? (Commonly called a “megatree” by people in the Christmas display community.) And how much will it cost?

First, you need strings of color controlled RGB LED lights, wires to connect them, and a few power supplies. I bought 16 strands that have 50 lights each, with 6″ spacing (PixaBulb w/ Strawberry lens) from http://www.diyledexpress.com. (I also got a 17th strand as a spare, and am using it as my tree topping star right now). This cost me $650 (including extra connection wires & two 12 volt power supplies).

Then you’ll need a light controller. I bought a Falcon 16V3 from https://www.pixelcontroller.com for $210, and a CableGuard CG-1500 outdoor enclosure to protect it from the elements. (This enclosure holds the controller board, but is not large enough for the two power supplies, which I have under a better ventilated anti-rain plastic storage box)

Then you’ll need a lot of mounting hardware (lag eyes, quick connect links, etc) and wire ropes (small cables, cable thimbles & crimp connectors) plus zipties, lots and lots of zipties. I used stainless steel hardware from e-rigging.com except for the galvanized wire rope that I bought at Harbor Freight (shipping a 500′ spool of stainless 3mm cable was prohibitively expensive). Including miscellaneous pieces of wood I used for my mounting ring and star tree-topper, a few extension cords, tent pegs and a 100′ run of Ethernet cable, all of this hardware cost me around $245.

I’m not including the cost of all the tools needed, plus a laptop to sequence and control the show.

So all in, for a “mid-sized” megatree (20′ tall, 16′ diameter at the base) you are looking at a little over a thousand dollars (plus a hundred hours of work). On the plus side, this cost can be amortized over multiple years, so it’s cheaper than multiple years of fireworks. Plus, with some creative work, you could re-purpose the lights for Halloween, weddings, parties, etc…


A more specific list of mounting hardware:

4x 1/2″ x 6″ Stainless Steel Lag Eye Bolts – Mounted in my tree. Completely overkill for supporting my relatively lightweight megatree, but may be re-purposed in the future for heavier loads. Holds up 4 support cables that allow me to raise/lower my top support ring.
20x 3/16″ Stainless Quick Links – for connecting and disconnecting the four support cables and top ends of the light strands to the top ring. I bought a 50 pack from a Chinese seller on ebay, as stainless steel quick links were quite expensive otherwise.
40x 1/8″ Light Duty Stainless Steel Wire Rope Thimble – Used at the top and bottom of each light strand, plus for the cables that lift the top ring.

40x 1/8″ Zinc Plated Copper Sleeve – Crimp connectors that hold the cable in place around the thimble. (Buy the proper crimping tool for these.)

16x 3/16″ x 1″ Stainless Steel Lag Eye Bolt – For connecting the top of the light strands to the top ring.
4x Eye bolts, washers & nuts to mount in the top ring for the support cables to connect to. (forgot the exact size, bought them at Lowes)
4x 4″ Stainless Steel Flag Pole Cleats – My jury-rigged solution for holding the four cables that support the top ring. I’m sure you could come up with a better solution.
16x 9″ tent pegs (bought at Walmart) for staking down the ends of the light strands.
8 packages 100′ 3mm galvanized wire rope from Harbor Freight (16 26′ light strands, 4 50′ support cables, leaving several 20′ seconds left over…) I seriously considered buying a 500′ spool of 1/8″ stainless cable from e-rigging.com, but the added shipping cost made it prohibitively expensive. I’m willing to pay double for stainless, but not quadruple to get it shipped to me. Plus I figure the LED light strands will probably fail before the 3mm wire rope rusts through….
800-900 black zipties from harbor freight (to hold the lights to the light strand cables.
Misc deck screws to hold the top support ring together (made of 2×4’s) and mount the flag pole cleats and cable guard enclosure to the tree.

Wifi Printing to HP Envy 4500 printer chops off top of page

If you are printing from Ubuntu Linux to an HP Envy 4500 printer and try to print a document with a very small top border, you may find that the printer chops off the very top quarter inch of the page.

The fix I found was to change the paper size from “US Letter (11 x 8.5)” to US Letter Borderless (11.14 x 8.72)” in the print drivers.

I have read several places online where other users with Mac’s and Windows machines have the same issue when printing over wifi, so I feel the issue is with the printer itself (and it’s wifi to printing bridge) as opposed to the Linux drivers.

FB1-4001A motor brush photos

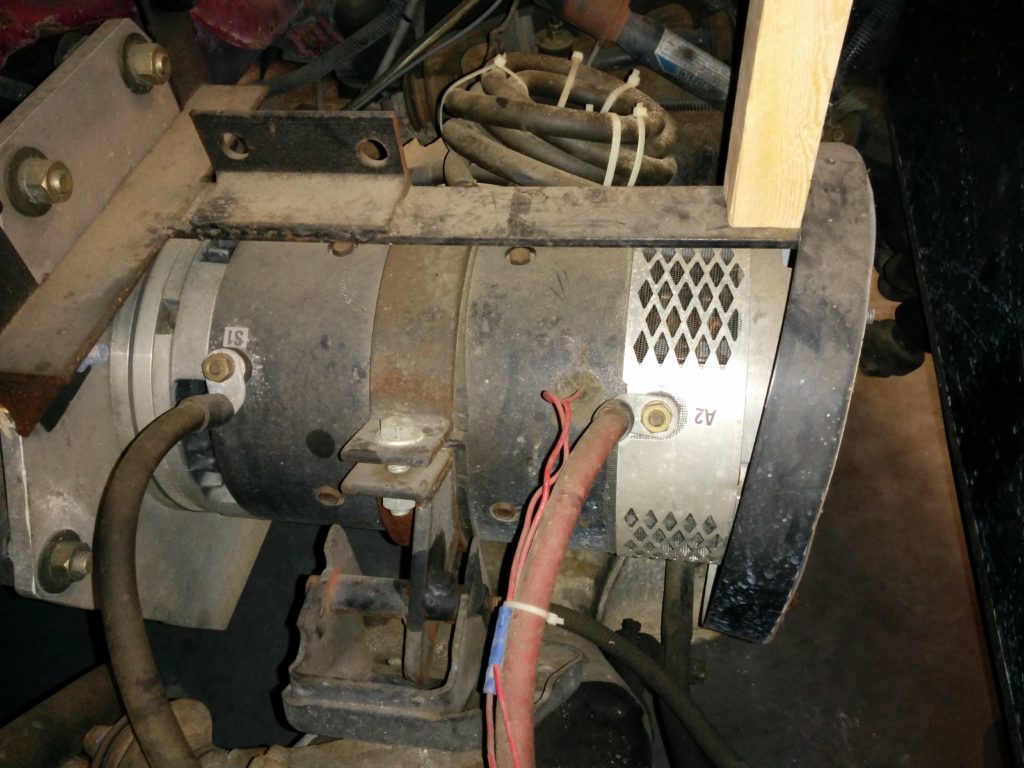
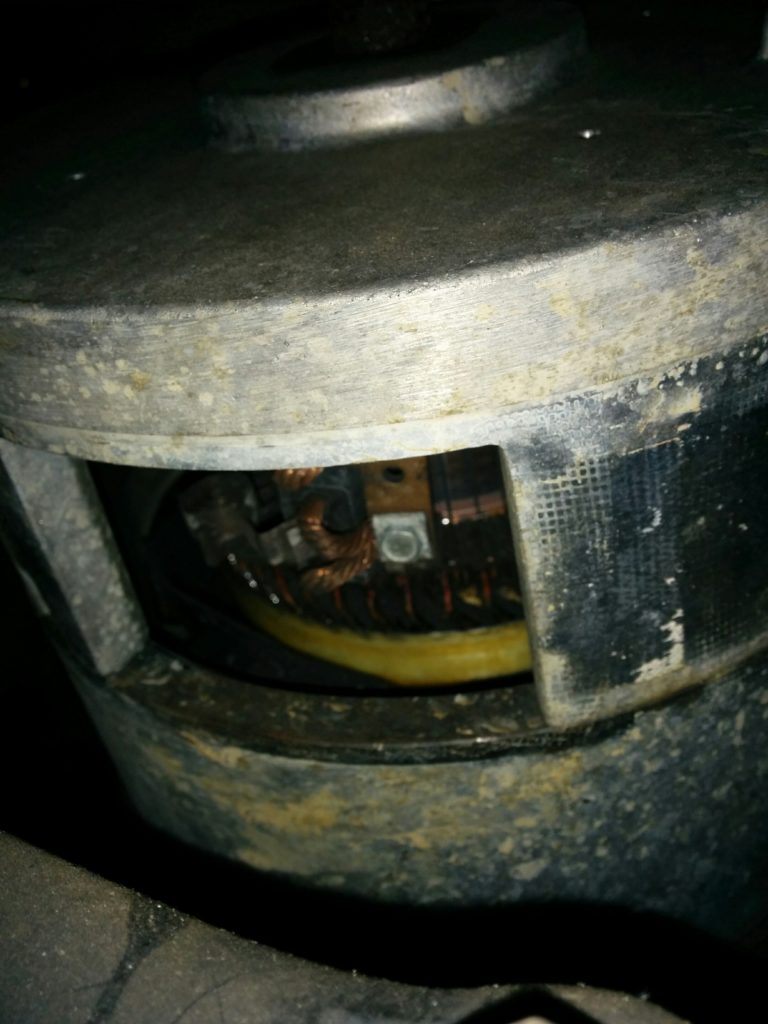
Here are some photos of the brushes installed on my DC FB1-4001A series wound motor, rated at 72-144 VDC, (19kW) 25HP continuous ( 100 ft/lb of torque / 48hp @ 500 amps ) which is   9.1″ in diameter.

My motor has a curved protective metal sheet that wraps around the front of the motor (the aluminum with diamond cutouts that has a cutout for the A2 post in this photo). It has a spring catch that releases it (not shown) on the other side of the motor.

I use the metal sheet to hold down fiberglass screen material underneath the diamond cutouts to provide extra protection from road debris. The brushes are accessed after removing the sheet.

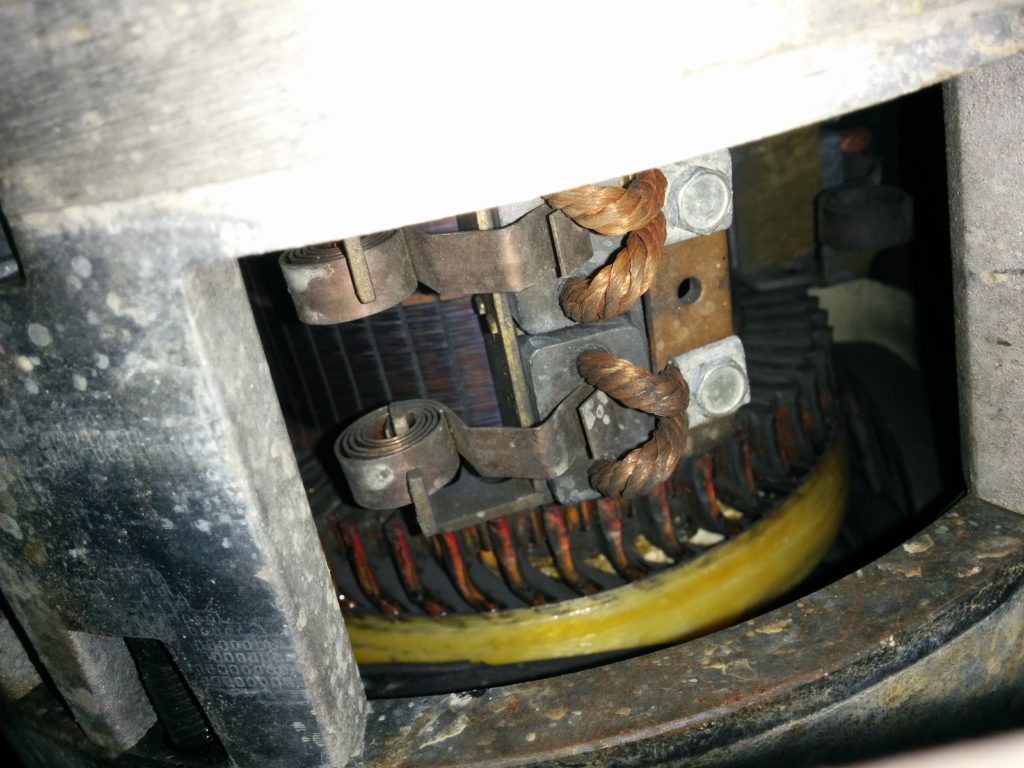
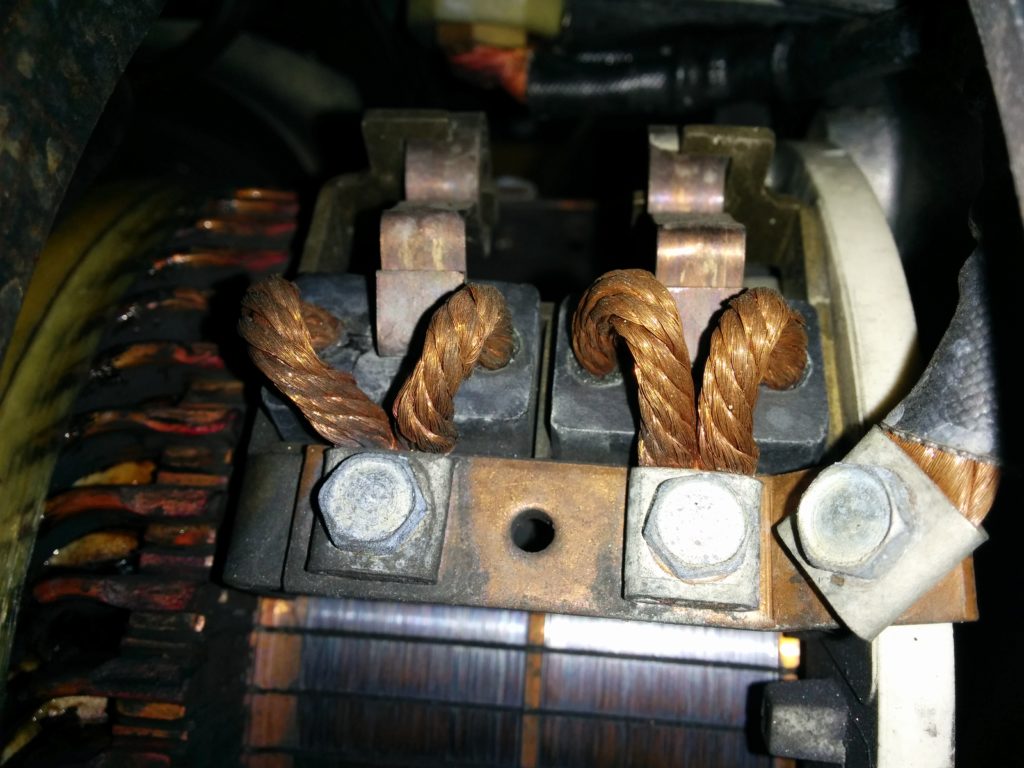
The brushes are mounted in pairs, and each brush is held against the commutator by a metal spring and has two copper pigtails to transfer the current.

Here is a closeup of two brushes where you can see the commutator which rotates under them.


Ego 21″ mower (LM2100SP) self propel motor failure & repair report

After four months of ownership, around 40 hours of usage, the self propel motor unit on my Ego 21″ Self-propelled electric lawnmower (Model LM2100SP) failed. Before this failure I was very happy with its performance, and although it was repaired under warranty, the procedure took longer than I think was reasonable.

Ever since I purchased the mower, I have been monitoring the Ego community forums, and I knew that reaching a customer support representative would sometimes take extended hold times, and I had heard that taking a mower to Home Depot for repair could be an extended procedure, so when my self propel motor failed, I was relatively well prepared on how to handle the situation.

August 29th, 2017 – The self propel motor fails. I finish mowing my front lawn pushing the mower by hand (which makes me realize that paying extra for the model with the self propel motor was the right choice.)

August 30th, 2017 Time to call customer support. After re-charging the battery, and letting the mower sit overnight to cool, I tested it again (yep, still no motion) and then called Ego customer support early in the morning (to avoid a long wait on hold.). I only had to wait a few minutes on hold, and then a helpful customer support representative walked me through a few simple questions (yes, my mower blade would turn on and spin, so the battery was good, and the folding handle interlocks were correctly latched, etc…) to verify that the drive motor had actually failed.   After that, she “made a note in my file” and told me to take it to Home Depot.

What I wish she had told me: 1. Home depot will charge you a $20 deposit, just to look at the mower (and you authorize up to $150 worth of repairs upon drop-off). They will refund this deposit to you if the work is covered under warranty (mine was).   2. You can only take the mower to a Home Depot that has a tool rental / repair clinic (call first to check). 3. The Home Depot repair clinic doesn’t have their own EGO batteries for testing, so be sure to leave your battery in the mower. [This makes sense in hindsight, but I was hesitant to leave 7.5 AH battery that costs $400 to replace at HD, so this required me to make a second trip back to HD with the battery a few days later.]

Also, after talking with her I received an email from Ego that stated my “case had been closed” (this is the case associated with the phone call to Ego only…but the wording of the message didn’t inspire confidence.)

Because I had heard horror stories about the Home Depot repair clinic taking a long time to repair EGO mowers, I made sure I called them every week to check on the status of my mower, just to make sure it hadn’t fallen into any cracks. I also posted an update every Monday on the ego customer forums, which may have also helped things behind the scenes.

Sep 18th 2017: They are still checking on the mower, but the HD technician felt that they could repair it locally instead of shipping the mower to Atlanta.

Sep 25th 2017: In progress, waiting on a part which usually takes a week or two (presumably the motor/gearbox unit).

October 2nd 2017: HD is still waiting on the part.   [After this update to the Ego community forum, April from EGO said that they were tracking the shipment and that the part should be arriving at the HD store within a few days.]

October 9th 2017: HD claims to still be waiting on the part.   [I mentioned this on the Ego community forum.]

Finally, on Thursday night (Oct 11th), Home Depot calls me to tell me the mower is ready for pickup. Because the home depot with the repair clinic   is 12 miles away from me, I delay pickup until Saturday.

So, it took Home Depot / Ego about five weeks to get my mower repaired, and this was with me keeping on top of Home Depot and making sure that Ego knew what was happening at each step. Reading several other reports on the ego community forum makes me believe that my experience was actually on the faster side of things, as 8-10 week delays are not unheard of if the mower gets shipped to Atlanta for repairs.   I paid $180 to a lawncare company and took a break from mowing my yard, but there are at least three other options to keep mowing if you find yourself in this situation.

Take advantage of Home Depot’s 90 day return policy

Many others in the Ego forums have bought another Ego lawnmower and used it while theirs was in for repair, returning it under HD’s 90 day return policy once their mower was repaired. I felt that this action would be ethically questionable, but after waiting five weeks for HD to repair my mower, my ethical resolve is beginning to weaken, and should the mower fail again, I will seriously consider this option.

Buy a second mower

I did consider buying a second Ego mower (and keeping it), mostly as a way to purchase a second 7.5 Ah battery (it is almost as cheap to buy the battery and mower together as to buy just the battery, plus you get a “hot spare” mower). Other than the fact that you have to store the 2nd mower, this does have certain advantages. If one mower fails, you can just switch over to using the second mower while the first is in for repair. And, you get the advantage of having twice as many batteries and chargers.   Unfortunately,   at the time Home Depot was not offering the same $50 discount on the mower as when I initially purchased mine, otherwise I may have done this.   [My wife points out the questionable logic of using the failure of a product to justify the purchase of a duplicate of the same product…]

Burn hydrocarbons

Of course, you could also buy a cheap used gas mower and several gallons of gas for less than the $180 that I paid for lawn care service, and probably be able to resell it at almost the same price you paid when finished.

Final Recommendation

Due to the fact that my self propel motor failed after 4 months of ownership, combined with a 5 week repair time, I can’t recommend the EGO electric mower to everyone. At least with a gas mower your options for repair are numerous and much faster. However, if you have decided that you will be going with an electric mower, I still think that the Ego line has the best performance. (I have also posted a review of the mower.) I also own the hand-held leaf blower and chainsaw from their Power+ line, and have been quite happy with them.

Update:
The new self propel unit installed by Home Depot   failed again (after 9 more months of usage) but I’m much happier with how Ego handled the warranty repair (via a direct replacement), which you can read about here.

2nd Update: Ego has started to produce updated 21″ SP models that have a new self propel unit that matches the one found in their dual battery (premium) mowers. Look for a picture of a phone on the box (see this video for details: https://www.youtube.com/watch?v=JtLkT5X4MQw )

3rd Update: My self propel unit failed a 3rd time, but this time the replacement I got looks different, so I think I may have the new model now!

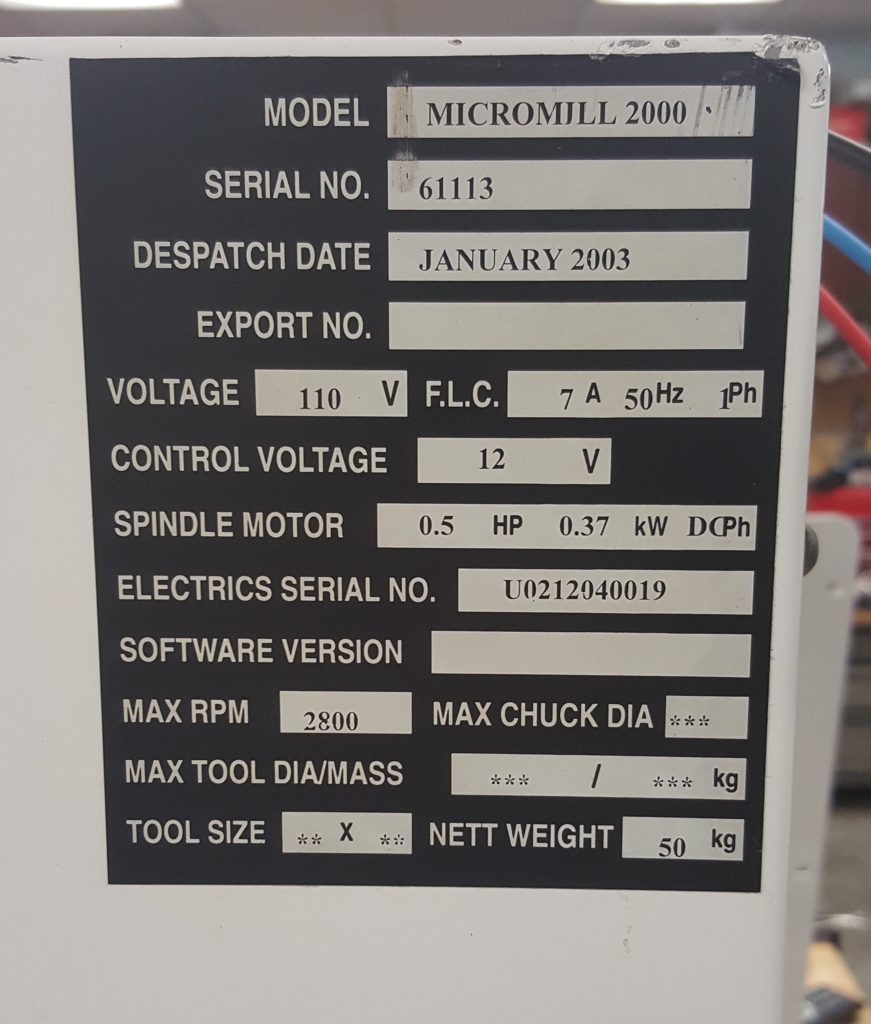
Denford Micromill 2000 January 2003 dispatch date – SGR location

Cliff Burger is part of a makerspace ( http://www.tcmakerspace.com ) which had a Denford Micromill 2000 (January 2003 dispatch date) donated to them. When referring to my four part series( 1, 2, 3, 4)   about how I got mine working under CNC control, they noticed a few differences with their model and wanted to share that information.

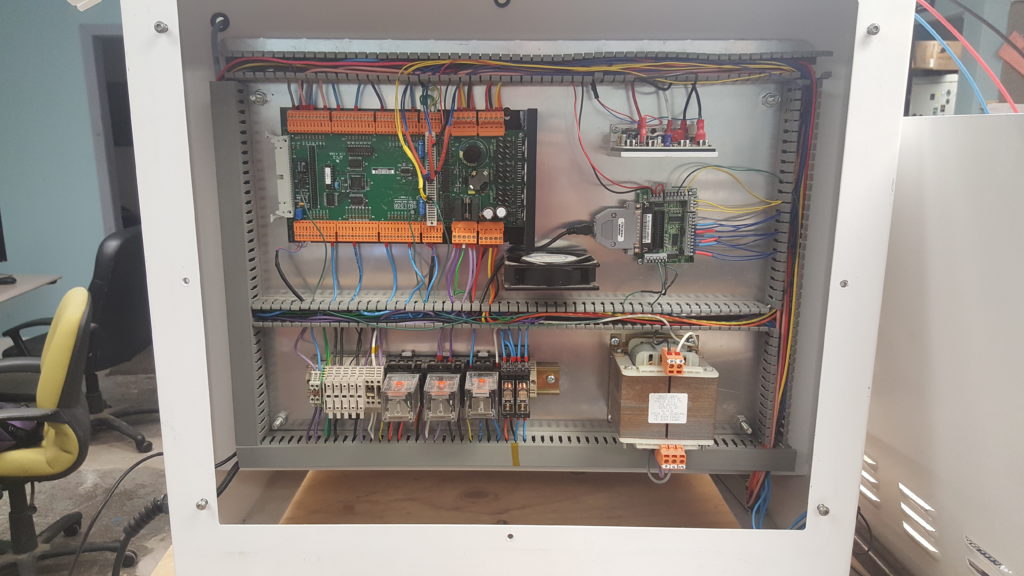
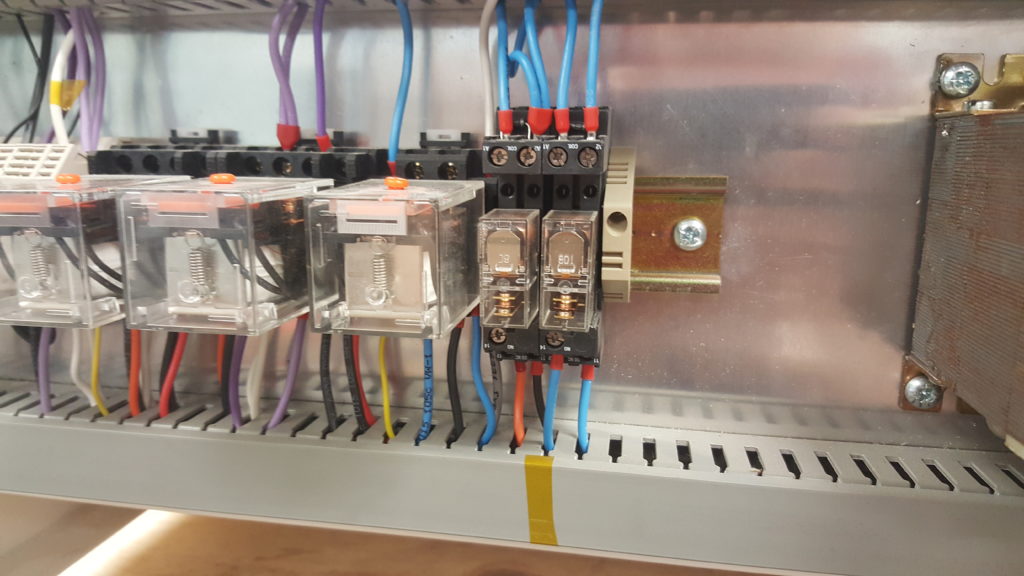
Instead of having a custom made relay & power board, their mill has it’s relays mounted to a DIN rail (bottom left of the case in the image below).   The spindle go relay (SGR) is located in the 2nd from the right position.

A quote from Cliff:

On the DIN rail, the spindle activation relay is the second one in from the right. It’s a 12v relay with the ground for the coil being controlled by the C6 pin. However, currently the relay never sees a 12V signal either. Not sure if it’s something wrong with my board or it’s waiting for another command signal before it sends the 12V out as well. Either way, I’ll likely just get a 5V relay and switch it right off the BOB, but for the time being I’ve moved the orange wire from the “14” position to the “12” position to supply power to the board at all times.


Cliff also sent along his mach3 config file, which you can download here (note, you will have to remove the .txt extension from the file to use it.)   Denford.xml.txt

He has the following caveats:

Things to note about the mach3 config:
1) My limit switch are on different pin numbers due to me chopping 1 wire a bit shorter than I should have (oops!).
2) default units are in inches so the steps per INCH are correct, but may need slight tweaking for each application.
3) backlash settings will need to be measured for each mill, or disabled.
4) I’m running a UC100 UBS adapter board so Mach3 may give an error message the first time you open it with this config file.

How I powered my fridge through a multi-day outage from an electric vehicle

When hurricane Irma threatened Florida, I was not worried about the food in my fridge going bad or scrambling to buy ice, because I had an inverter in my garage hooked up to a 12 volt battery made up of two golf cart batteries. With new batteries, this setup would provide around 2 kWh of backup power, although I’m currently using 4 year old batteries that had previously seen 400 cycles of use in an electric vehicle, so the actual performance is closer to 0.6 kWh (600 Watt/Hours).

Our energy star fridge/freezer draws around 240 watts of power when running the compressor, although the average energy draw is lower as the compressor shuts off once it reaches temperature. So the golf cart batteries alone would be enough to power my fridge for 2.5 hours of continuous cooling, or 5-8 hours of typical usage assuming the fridge wasn’t having to work super hard to cool things off.

When Irma hit, we lost power at 1am on Monday were without power until 5pm on Wednesday, or around 64 hours. However, I only ran my backup system for 31 of those 64 hours. I first hooked the system up around 1pm on Monday, and ran it until 10pm. I shut it down overnight when I was sleeping and ran it around 11 hours each on Tuesday and Wednesday during the day. My fridge was easily able to keep things frozen/cold overnight and “catch up” during the days (I had loaded the freezer up with a lot of frozen water, and the fridge with a lot of chilled water well before our outage occurred).

Over the 31 hours I ran the system, we averaged 190 watts of draw per hour (or 5890 watt / hours or 5.89 kWh total), which is significantly larger than the 0.6 kWh the golf cart batteries could provide alone. This draw was primarily from our fridge, although we also used 20-50 watts of power to keep our DSL wifi-router running and charge personal electronics, as well as running the power hungry microwave for a few minutes at a time.

To augment the stored power in the golf cart batteries, I wired them in parallel with the 12 volt accessory battery on my electric truck (which has a 20-22 kWh battery pack). By leaving the ignition of my truck turned on, I enabled my 500 watt DC2DC converter which continuously charges the 12v accessory pack from the main (LiIon) battery pack. Because the 500 watt DC2DC converter was providing well more than the 190 watt average draw, the system worked well.

The golf cart batteries acted as a “buffer”, providing extra power to the (2000 watt) inverter if needed. [For example, when I used our 1300 watt microwave to heat up food for 5 minutes here and there.] And the golf cart batteries were topped up by the 12 volt system on the truck, ultimately powered by the main traction pack.

One big advantage is that the system is nearly silent, generating only a slight hum from a fan in the inverter that becomes inaudible as you walk away from it.   It also has no danger of producing deadly carbon monoxide, which has already killed several people in Orlando due to mis-using gas burning generators.

It took 8.34 kWh to recharge my truck after the outage was over, so my overall system efficiency (power provided / power required to re-charge) is 70%, which isn’t bad considering the parasitic losses from keeping all of the truck’s systems active, the losses from the DC2DC converter going from 120v DC to 12 vDC, and the inverter going from 12v DC to 120 v AC, heat losses, etc.

So it looks like I could easily ride out a 5-6 day power outage before needing to find a generator or EVSE to re-charge the truck (And we haven’t even tapped the Leaf’s battery pack yet….there are commercial offerings for that.).   One advantage of having your battery pack inside a vehicle is that you can drive it elsewhere to recharge. An EVSE located two miles away from me had power starting on Tuesday, so I wasn’t worried about being able to recharge my truck…

30 second delays in internet on AT&T U-verse 5268AC FXN modem

My wife and I were running into inexplicable “delays” in our AT&T internet service over WiFi. The speed of the internet would be fine when it worked (speedtests showed good lag/upload/download, etc…) but sometimes the entire internet would “pause” and not respond for 20-30 seconds at a time. Usually not enough time for a connection to time out, but websites would be stuck loading for a long time, or Google Web Apps wold have a “loading….” message for half a minute before recovering (or failing to recover, making us try again with an edit to a document or calendar item…).

After much gnashing of teeth, network profiling, and dark vodoo, we traced the problem down to our devices auto-switching between the 2.4 Ghz and 5 Ghz wifi networks from the router [a Pace DSL modem Model 5268AC FXN ].   The problems happened most frequently when we had about 50% wifi signal strength to the 5G radio, and apparently our devices would see the stronger signal strength on the 2.4 router and switch over to it, then decide to switch back, and so forth.

The root cause of the problem is that the AT&T Uverse DSL gateway / wifi router has both networks with the same SSID (Name) and password, so our devices felt that they were “the same” network, just on different frequencies, and would switch between them frequently.   I have no idea why this would cause a delay of TCP/IP traffic, as a change in the physical/data link layer shouldn’t affect the Network/Transport layers (at least, not for 30 seconds).   Perhaps when using a different brand/model of Wifi Router devices can auto-switch between 2.4 and 5g seamlessly. ( Or perhaps not, our previous cable modem from Spectrum / BrightHouse named the two networks differently (with a 2 and 5 suffix) so that once you connected to a particular network frequency, you stuck with it, but at least we didn’t see this type of issue. )

In any case, the solution was simple. For testing purposes, we fixed the BSSID (mac address of the router) in our client devices to the 2.4 Ghz network, so it would not switch to the 5 Ghz radio. This fixed the problem.   Renaming the 5 Ghz network name to something different from the 2.4 Ghz network on the router would also have the same effect for all devices (for example, using myNetwork2.4 and myNetwork5 as the names).

Amazon Dash Wand

Amazon is running a promotion where you can buy an Amazon Dash Wand with Alexa for $20, and get a $20 credit on your account when you register it. (So if you are a prime member with free shipping, you get a dash wand for $1.30 in taxes.) It’s basically a handheld wifi enabled barcode scanner with Alexa voice input designed to get you to buy more stuff from Amazon.

The wand arrives in a small blue and black box, and is half white and half black. The black end shrinks to a rubber ring so that you can hang it up on the included sticky hook, and it has magnets hidden inside so you can stick it to your fridge.


To install the two AAA batteries (included in the box) the quickstart guide says “Open the Amazon Wand by pulling the two halves apart” when it should really say “Get two strong guys to play tug-of-war with your wand until the two sides pop apart”.

It requires you to have the Amazon app on your phone to pair the Wand with a (2.4 Ghz only) Wifi Network, which also links it to your account. After that, you can use the wand by pressing the button. A red light shines out the end, and if you point it at a barcode, the item will magically appear in your Amazon Shopping cart. (No wonder they are practically giving them away…)   You can also press and hold the button to talk with Alexa, to, for example, add an item to your cart that doesn’t have a barcode by voice.

Amazon music is not supported on the device (I suspect playing music would run the AAA batteries down too quickly, plus the single speaker isn’t exactly high quality), but some other Alexa skills are, so you can check on the weather or play colossal cave (although you have to push and hold the button every time you want to issue a command).   Home control commands (such as HUE lighting) is supported, so this could make a good secondary control device for a smart house. Messaging with Alexa is NOT supported. (Which is a pity, as it’s ALMOST small enough to wear like a   combadge.)

For a teardown, see this link.

Practicalities of On-board solar charging for small EV’s

I’ve been running the numbers on building a small 1-2 person “motorcycle” (3 wheeled) electric vehicle, and was considering adding two 330 watt solar panels to act as the hood and roof/sunshade, which would provide shade for the driver and charging from the sun.

The drive motor I was looking at runs at 96 volts and 95 amps to drive a 325 lb vehicle (with 170lb rider) at 60+ mph. Twelve Nissan leaf modules would provide 96-100 volts at 60 ah for a total storage capacity of 5.7 kWh (giving around a 45 mile range at 60mph, probably close to a 60 mile range at 35mph, an efficiency of   between 83-111 Wh/mile).   This battery pack would weigh 100 lbs, plus BMS/mounting hardware and wiring.

Weight Considerations

Two 330 watt solar panels mounted on the roof/hood would also weigh 100 lbs.This could conceivably be 30% or more of your vehicles weight budget.

With around 6 hours of good solar exposure a day, they would probably provide around 600 watts per hour, or 3.6 kWh of charge (a gain in driving range of between 32-44 per day). They could fully charge my hypothetical 5.7 kWh battery pack in two days.

More batteries?

The alternate way to spend this weight budget is to double the battery pack size. This would give a 11.5 kWh battery pack, giving 90-120 mile range from a single charge. A side benefit is that the extra 100lb of weight could be placed low to the ground, instead of up high on the roof of the vehicle, greatly improving performance on corners.   (Also, the aerodynamic effects upon handling and range of adding a horizontal sail to the top of your vehicle must be considered….)

In my opinion, if you are regularly returning to a home charger, it is more practical to use extra weight allowance for batteries, as opposed to solar panels. Solar panels make the most sense when the vehicle is designed for non-round-trip applications, such as with an RV/Camper or road trip vehicle.

Bigger/Faster charger?

For an “in-town” vehicle, where J1772 (level 2) chargers are readily available, adding a high speed on-board charger (6.6kWh) would allow you to refill a small battery pack in under an hour, and would add less weight than commercial solar panels or extra batteries.   Having an extra 15 lbs of charger instead of an extra 100 lbs of solar panels or batteries would lower your rolling resistance and increase your range and acceleration.

Specialized solar panels

Alternate solar panels (smaller RV style, or thin film flexible solar panels) would weigh slightly less, but the weight savings is not as impressive as you may think. A 330 watt “house style” panel weights 50 lbs, or 0.15 lb per watt. A 100 watt RV panel weights 15 lbs, or the same 0.15 lb per watt. A 72 watt PowerOak flexible panel weights 6.2 lbs, or 0.086 lbs per watt. This is a weight savings of almost 50%, but unfortunately they are much less efficient, so would need more surface area, something in short supply on a motorcycle class EV, plus they cost much more on a per-watt basis.

Custom Alternatives

If you wanted to take the time to fabricate your own solar panels out of individual cells as part of a fiberglass layup, you could conceivably make them weigh less and fit the contour of your vehicle better, possibly integrating them into your vehicles body.   But if they are integrated into the skin of your vehicle you have to worry about solar heat gain. I think it would be better to have them mounted as a “shade” or “2nd skin” just above your vehicles main body with airflow channels between the two.

Cost Considerations

100 lb of 330 watt solar panels (two) cost around $500, while a 100 lb Li-Ion battery pack would cost about $1200-1500 (unless salvaged from a surplus battery pack). So the solar panels could cost less than a larger battery, but would require more work to integrate into the vehicle. A 1.5 to 2kWh charger would be fully adequate for a vehicle with a 5.7 kWh battery pack. You could even have only 110V charging (1kWh) and save the expense and complication of a J1772 inlet, while still being able to recharge a fully used battery pack in six hours. A minimal charger like the ELCON PFC1500 would cost $575.   An Elcon PFC 5000 ( TCCH-84-50 ) could charge at 5 kW, giving a small EV an almost “QuickCharge” charging speeds for around $2000 with J1772 inlet/adapter.

Modular Vehicle

One option would be to mount several solar panels on a trailer (possibly with a 2nd battery pack, and even extra motors) to be used only on longer “road-trips”. It is possible that the trailer could have room to hold 4×8 sheet goods, and/or a sleeping compartment under the solar panels for road trips. If the solar panels could swing up, it could be used for transporting larger furniture or appliances. (Consideration would have to be given to adding a lower gear ratio to the tow vehicle, or including extra motors on the trailer itself for heavier loads.)