Evaporation: subtle Bubble Display problem number 1

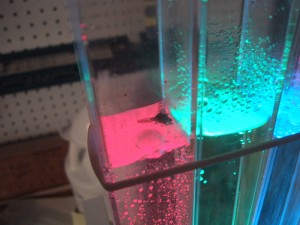
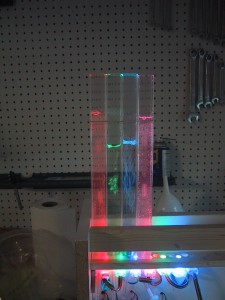
After leaving a prototype bubble display running for a week (in 80-100 degree weather) I returned to find the following clear case of evaporation:

Two tubes of water evaporated to lose several inches

The two tubes on the outside have glycerin, while the two tubes in the center (which are several inches lower) contain water. I didn’t leave a marker of what level the tubes were filled to at the beginning of the week, but the water tubes have obviously lost several inches due to evaporation. (The continuous bubbling action helps evaporation along quite a bit…) It looks like the glycerin suffers less from evaporation, but I expect that even a glycerin filled bubble display will need periodic refills. Note that the 80-100 degree (and dry) weather may have made this problem more pronounced.

_except_handler4_common could not be located (py2exe)

When developing python2.7 py2exe applications on Windows Vista or Windows 7, and deploying the applications to windows XP, some of the DLL files that may be automatically included in your distribution directory may trigger an error message such as the following because they import an incorrect version of msvcrt:

_except_handler4_common could not be located in the dynamic link library msvcrt.dll

One annoying thing is that py2exe is incorrect, and these DLL files don’t actually need to be included for your program to function correctly. Another annoying thing is that the DLL files that trigger this error message are not always the same. Some people have found it to be MSWSOCK.DLL, or DWMAPI.DLL.

To this list I can add DNSAPI.DLL as a DLL file that I had to exclude to remove this error.

And for good measure, USP10.DLL had to be excluded to remove a different error…

Scaling up to six feet!

So far I have been using 1 and 2 foot acrylic tubes to try out different nozzle types, acrylic welding techniques, and liquid bubble mediums. Now that I’ve selected my nozzle (a 1/4″ coupler that joins the 1/8″ vinyl tubing in polycarbonate) it’s time to scale up to full six foot tubes.

Although all of my calculations told me that everything should work with a six foot acrylic tube, you never really know if something is going to scale up correctly until you try it. For example, here is a list of possible problems with scaling up (ordered by probability):

  • The air pumps, which are rated to a max pressure of 350mmHg (basically meaning they can just barely blow a bubble into a column of mercury 0.35 meters high, or deliver 6.7 psi), won’t actually achieve their rated pressure, and be unable to blow a bubble into a 6 foot high column of water (4.7 meters of water is equivalent to 350mmHg…but still….)
  • The bond holding the nozzle and bottom of the acrylic tube which worked fine for 1 foot of water would spectacularly fail when loaded with 6 times the pressure.
  • The Acrylic column won’t be able to support the water pressure, and will burst. (Even 1/8″ acrylic is relatively strong, if brittle, so I wasn’t really worried about this one…)
  • The cyclic pumping, combined with flashing RGB LED’s would interact in a heretofore unknown way to produce fusion, a la Chain Reaction (1996).

Fortunately, everything worked just fine. What does an air bubble look like rising thorugh six feet of water? I’m glad you asked. Watch this video:

Trying out different nozzle sizes and material

The nozzle size has an effect on the amount of air (expressed in milliseconds of pump activation) that will form into a single bubble. In water, even if you launch a stream of several bubbles, they typically join together relatively quickly to form a single bubble. However, with Glycerin the bubbles are more likely to separate, and the smaller bubbles rise slower, eventually getting caught and integrated into a larger following bubble. By increasing the nozzle size from a 1/8 inch hose barb to a 1/4 inch hose barb, I found that I could create larger more regular bubbles, and launch them closer together (temporally and vertically).

I also switched my nozzle material from Nylon (which acrylic weld won’t weld, and required the use of epoxy) to Clear Polycarbonate, which acrylic weld WILL weld. This allows me to use a single welding solvent to construct the entire tube assembly, and gives me more confidence in the bond. (Although the Epoxy appears to be working well….) Because they are clear I can visually inspect the weld between the bottom of the tube and the nozzle. Also, they blend into the acrylic bottoms of the tubes and give a much nicer visual appearance. The specific part I used to get both polycarbonate and a 1/4″ output was a Single-Barbed Reducing Coupling for 1/4″ X 1/8″ ID Tubes. The nylon 1/8″ nozzle cost 0.26 USD, the same part in clear polycarbonate is 0.47 USD, and if you want a 1/8″ to 1/4″ coupling it costs 0.70 USD, so the cost for the larger clear nozzle is nearly triple the plain old nylon part, but as a percentage of the total tube cost it is negligible.

Full Sized Bubble Display Mockup

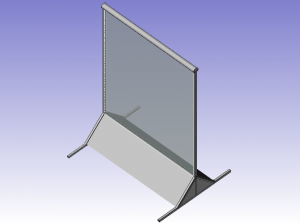
While my prototype bubble display is all good for testing, it really isn’t a good demonstration of the aesthetic effect I am imagining for a full sized bubble display. Here is my 3D mock up of a bubble display that would be made up of 60 tubes, making a 60 inch wide display that would stand 84 inches tall, with approximately 70 inches of visible bubble tube.

A tall display with transparent bubble tubes

Continuing with the “acrylic modern” aesthetic, the support frame would be built of t-channel (8020) aluminum, with plastic panels forming a triangular prism at the base which would contain the air pumps and electronics. The tops of the tubes would be covered with a curved mesh of metal wires. I imagine that the light transfered from the acrylic at the top of each tube will light up and refract off of the mesh nicely, plus the mesh will keep bugs out of the tubes.

Testing Glycerin as a bubble medium

The tube on the left is filled with Glycerin. I like how the bubbles float up much slower and are more defined. Also, because the Glycerin has a lot of “micro-bubbles” in it, the light from the RGB LED’s in the bottom of the tube diffuses out of the mixture much more, and gives the whole tube a colored glow effect.

One problem is that if I want to make larger bubbles (than in the video above) I need to increase the size of my nozzle. The current small nozzles will make “separated” bubbles if I run air through them for too long, demonstrated below in this video:

Of course, I had to try making bubbles really fast! (The upper limit in Glycerin is slower than in water…)

Glycerin is relatively safe (msds) as long as you don’t eat it, although it can cause skin and eye irritation if you don’t wash it off. Clean up is easy, as it dissolves in water, but it’s more messy than just plain water, and costs a lot more! Even buying in bulk, it takes $8 worth of Glycerin to fill a 6′ long 1″ square tube!

Bubble Display Videos

I have been playing around with the timing for how long to turn on the air pumps (as well as the delay time between bubbles). This video is my “favorite” so far for the solid bubbles (on the left) 30ms on-time, and 300ms delay. Obviously, the aquarium air stone tube (right side) needs a longer delay to separate the air pulses.

Of course, I also tried playing around with super fast bubbles!

And with the smallest bubbles I could make (the electronics can give a 1ms pulse, but the motor/air-pump needs at least 8ms of power to eject a bubble…)

Bubble Display Prototype 1

I have the physical structure, electronics, and pneumatic systems all integrated (for 2 of 6 channels) on my first prototype for the Bubble Display. The electronics are mounted on one side of the upright board, while the air pumps, check valves, LED lights and acrylic tubes are mounted on the other. (Click photos for larger versions)
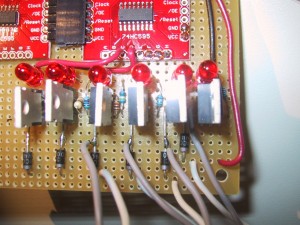
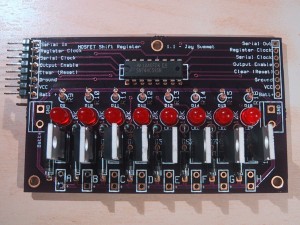
The electronics for a bubble display prototype

Six air pumps, connected with check valves to the bottom of acrylic tubes filled with water

And here is a video of the system driving two channels (tubes of water). This is a 10ms bubble size, which is quite small. I will be experimenting with various lengths of time to drive the air pumps to make bubbles of different sizes, as well as experimenting to find out how small of a delay I can use without having the bubbles run into each other as they rise. (The length of the tube will affect that as well, so it’s just about time to make some six foot tubes!)

Addressable RGB LED string

This string of 20 Red-Green-Blue LED lights is addressable via SPI interface. Each LED has an WS-2801 LED driver IC and they are daisy chained in a long string. The plan is that each column in the bubble display will have it’s own LED at the base. I can even plug more strings of 20 end-to-end to expand to 40 or 60 addressable color controlled columns.