Moto X4 power button failure (part 2)

Remember how my Moto x4 had a power button failure after 10 months of ownership? Well, the replacement x4 phone that Motorola shipped me had its power button fail in the same way after only a month of usage. Luckily, I still have a month of warranty coverage, and their customer support representative again waived the $24.99 “Premium” fee to ship me a replacement phone before I ship them back the broken one (with a $200 deposit.)

However, I’m not at all impressed with the hardware quality of the power button on this model. I think I will have to just set the screen timeout to a small number of seconds and stop turning the phone off with the power button. (It already has a swipe to activate feature so you don’t need to use the power button to turn it on…)

Installing Garage Door Slide Locks

My garage has four doors (two in the front, and two in the back) which gives a lot of cross-ventilation potential, but unfortunately some of the doors had the slide-locks installed incorrectly, such that there was no available slots to lock the doors in a “slightly open” position to let air circulate.   They also only had one lock per door, so I rectified that situation by adding a 2nd slide lock to the other side of each door, and moving a few of the original slide locks so that two of the doors can be locked with a 2″ gap below them.   I spent less than $30 for all four slide locks and a box of self drilling sheet metal screws, so it was a relatively quick and inexpensive improvement.

Banshee sailboat rudder & tiller rigging

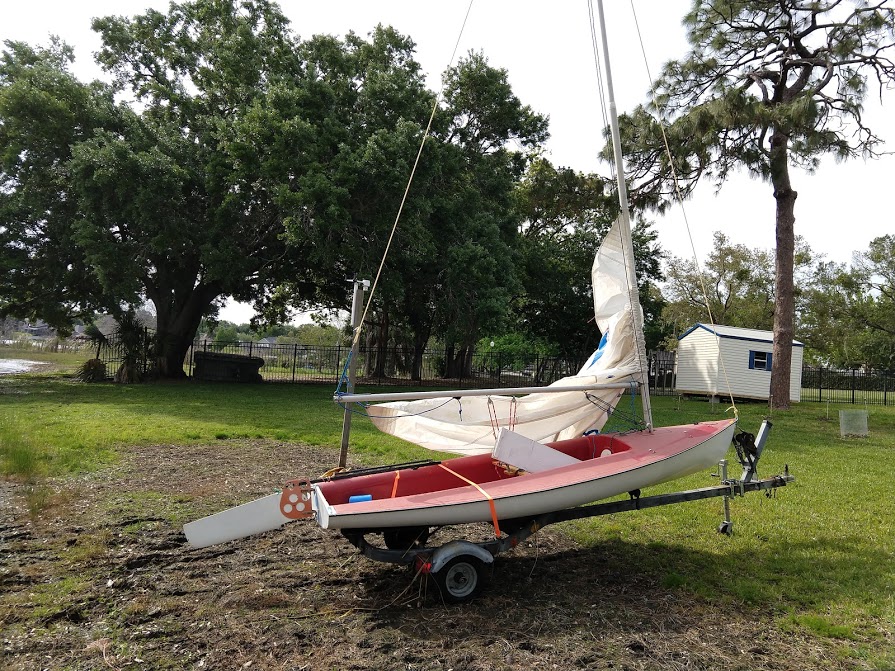
This is my new (to me) Banshee sailing dinghy. She is 13 feet overall, and cat rigged, which means she only has a single sail behind the main mast, with no head sail. This rudder and tiller doesn’t look exactly like that shown in photos online of other Banshee boats, so it may be a later retrofit.

This is how I rigged up the rudder and tiller. All of the attachment points were already there when I got the boat, but I added two bungee cords and an up-haul line. I have no idea if this is the “official” method, but it seems to work for me.

First, I wrapped a 24″ bungee around the tiller and secured it to this forward eye strap with a chain link and then attached it to these pre-existing eye straps on the inside of the transom. This gives an automatic “return to center” action for the rudder.

I used a 42″ yellow bungee cord wrapped in the middle around an existing bolt
in the front of the rudder to pull and keep the rudder down, while at the
same time, allowing it to rotate backwards if ran aground.

I attach the ends to this front eye strap when under way, or can move them
to this rear eye strap to make the rudder easier to lift.

I used a 1/8″ line tied to an existing hole in the back and of the rudder and routed around the tiller to a bottom mounted jam cleat to raise the rudder. It’s certainly possible that this jam cleat is really intended for a down-haul line, and not an up-haul line, as it’s on the bottom of the tiller.

So, that’s what I’ve done, it works for me, but feel free to leave a comment if I’ve completely messed things up.

Philips Norelco QT4085 beard trimmer disassembly and battery replacement

My trusty (yet old) beard trimmer has needed to be plugged in to use for a long while now, but the batteries finally degraded so much (I suspect they were a direct short) that even plugging it into its charger failed to make it work. So, I took it apart and replaced the batteries. (They needed it, I believe they were from 2001.)

This video distills what I learned (the hard way) about the proper order of operations for disassembling this model to get to the battery to replace it.

NES Classic 500 in one game console controller pinout

I had to repair the cable on one of those “500 in one classic game consoles” that look like a mini Nintendo Entertainment System (NES) but don’t actually say the “Nintendo” trademark on them anywhere.
An example can be found on Amazon here:
https://amzn.to/2JBgzSS

The order of the wires inside the controller on the PCB (NES01-JOYV1.1) is (from left to right): orange(red), yellow, blue, brown, white

The pinout for the wire colors at the end of the cable is as follows:

Orlando OTA Channels – 2018

A list of the digital over the air (OTA) channels I can pick up from the west side of Orlando.

  • 2_1 – WESH-DT (NBC)
    • 2_2 – Me TV
  • 18_1 – WKCF-DT (CW)
    • 18_2 – Justice
    • 18_3 – estrell
  • 35_1 – WOFL-DT (FOX)
    • 35_2 – Light
  • 24_1 – WUCF-DT (PBS)
    • 24_2 – Create
    • 24_3 – Kids
    • 24_4 – NHK
    • 24_5 – World
  • 45_1 – WTGL-DT (IND?)
  • 6_1 – WKMD-DT (CBS)
    • 6_2 – Cozi TV
    • 6_3 – Decades
  • 27_1 – WRDQ-DT (IND?)
    • 27_2 – Antenna
    • 27_4 – GRIT TV
  • 31_2 – WTMO-SD (Telemundo)
  • 68_1 – WEFS-HD (   far away station?)
    • 68_2 WEFS-CL
    • 68_3 WEFS-NS
    • 68_4 WEFS-FL
  • 15_1 – WDSC-HD (far away station?)
    • 15_2 – WDSC-ED
    • 15_3 – WDSC-WV
  • 9_1 – WFTV-HD ( ABC )
    • 9_2 – Laff
    • 9_3 – Escape
  • 55_1 – WACX-D1 (REL IND?)
    • 55_2 – D2
    • 55_3 – D3
    • 55_4 – D4
    • 55_5 – D5
    • 55_6 – D6
    • 55_7 – D7
    • 55_8 – D8
    • 55_9 – D9
    • 55_10 – D10
    • 55_11 – D11
  • 65_1 – WRBW-DT ( My TV)
    • 65_2 – Movies!
    • 65_3 – H&I
    • 65_4 – BUZZR
  • 52_1 – TBN HD
    • 52_2 – HILLSNG
    • 52_3 – COMBO
    • 52_4 – Enlace
    • 52_5 – Salsa

UK Denford Micromill 2000 (February 2002 dispatch date) interior photos

Steve is working on a UK (240 volt) Denford Micromill 2000 (February 2002 dispatch date). When referring to my four part series( 1, 2, 3, 4) about how I got mine working under CNC control, he sent me some photos of the inside of his unit which I am posting here with his permission just in case they can help others working with one of these units.


Disassembly and reassembly of my workbench

When I built a workbench out of plywood and 2×4’s   I designed it to unscrew so that I could move it out of the rental and into our next home.   It took a few hours and a lot of unscrewing, but I was able to transport it to the new house in a single load.


Re-assembly was much faster than the initial build as most of the screw holes lined up perfectly, although I did swap the position of two of the plywood side sheathing pieces based upon where it was going to be put up against a wall. I also chopped off the upper shelf overhang on the left side, and chopped a few inches off the height of the top shelf to accommodate the lower ceilings.

 
You can watch the video of the re-assembly process here:

Updating XML Google Maps plugin for newer versions of PHP

If you are using the XML Google Maps wordpress plugin (version 1.14.1 by Patrick Matusz), it has not been updated for a while, and won’t work quite right with newer versions of PHP.

If you are getting the following error message twice at the top of every page in your wordpress blog:
Warning: mysql_get_server_info(): No such file or directory in … on line 10

Change line 10 from:


if ( version_compare(mysql_get_server_info(), ‘4.1.0’, ‘>=’) ) {
to:
if ( version_compare($mysqli->server_info, ‘4.1.0’, ‘>=’) ) {

And that will make things work without the error messages.