Graphical User Interfaces
In this chapter we will learn how to create Graphical User Interfaces (GUI’s) and react to user input. I recommend you read An introduction to Tkinter for reference information on many tkInter GUI widgets.
Introduction
Copy the following code and run it. Note that in Python 3, the Tkinter module name is all lowercase!
1 2 3 4 5 6 7 8 | from tkinter import * #Import the Tkinter GUI toolkit module
rootWin = Tk() #Create a (single) TK main window
rootWin.title("MyWindow") #Set the title for our window.
l = Label(rootWin, text="Hello, World!") #Create a label on the rootWin
l.pack() #Pack the label (position on window)
rootWin.mainloop() #Run the main GUI event loop
|
This code demonstrates the basic code needed to create a window and add a label to it. If you ran the code interactively, typing one line at a time, you could see the window appear, and then the label appear in the window when the l.pack() function was called. The pack function also resized the window so that it exactly surrounded the label, without extra margins.
To learn more about labels, read about labels here.
Note that this program will continue to run (the mainloop) until the window is closed. The window is waiting for input from the user. You can stop the program by closing the window. Note that you should only create ONE root window for a particular application. If you want to make other windows, use the Toplevel object instead as described below in the section on multiple windows.
Adding Buttons
You can add buttons to the window as follows:
(Download button_example.py )
1 2 3 4 5 6 7 8 9 10 11 12 13 14 15 16 17 18 19 20 21 22 23 24 25 26 27 28 29 | #button_example.py
from tkinter import *
rootWin = Tk()
frame = Frame(rootWin) #Create a frame to organize the buttons
frame.pack()
def quitFunc(): #The quitFunc just prints a message!
print("Quit button pressed!")
def speakFunc(): #The speakFunc just prints a message!
print("Say hi!")
#Define button1, which has a foreground (fg) color of red, displays the
#text "Quit", and will call the quitFunc when it is clicked.
#It will be inside the frame created above.
button1 = Button(frame, text="Quit", fg="red", command=quitFunc)
button1.pack(side=LEFT)
#Create another button, displaying the text "Speak" and programmed to
#call the speakFunc when it is clicked.
button2 = Button(frame, text="Speak", command=speakFunc)
button2.pack(side=LEFT)
rootWin.mainloop() #Run the main loop.
|
In addition to drawing the buttons on the screen (by putting them inside of a frame that is in the root window), this code ALSO attaches each button to a function using the command parameter. Note how button1 has the quitFunc assigned to it, and button2 has the speakFunc assigned to it. When the user clicks these buttons, the respective functions will be called.
GUI programs are typically reactive. They will sit and wait for the user to do something (such as push a button) and then react to the user input by doing some processing (printing a message to the console in this example). You can learn more about button widgets here.
Layout of Widgets
Various widgets can be organized within a container such as a window or a frame using one of several different layout managers. We will discuss the pack and grid layout managers.
The Pack Layout manager
The “pack” layout manager allows you to position widgets in one of four locations: top, left, right or bottom.
(Download packLayout.py )
1 2 3 4 5 6 7 8 9 10 11 12 13 14 15 16 17 | from tkinter import *
win = Tk()
b = Button(win, text="Top")
b.pack(side=TOP)
b2 = Button(win, text="Right")
b2.pack(side=RIGHT)
b3 = Button(win, text="Left")
b3.pack(side=LEFT, fill=BOTH, expand=True)
b4 = Button(win, text="Bottom")
b4.pack(side=BOTTOM)
win.mainloop()
|
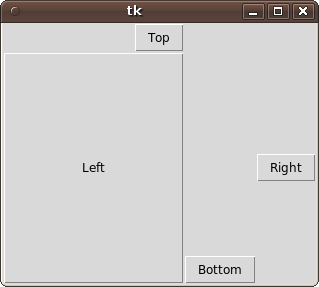
As you can see from this example code, widgets at the “TOP” appear above everything, while LEFT and RIGHT are positioned to the left and right of the BOTTOM widget location.

If you place multiple items in one location they will start to stack. For example, if you place two items in the TOP location, the first one will be on top, and the 2nd one will be below it. If you place two items in the LEFT position, the first one will be leftmost, and the second one will be to the right of it.
Typically we don’t use all four positions, and instead only use two of them to put one thing above another, or to the left/right of another. By combining a set of frames with the pack layout manager, you can build up more complicated layouts of widgets.
The pack layout manager also allows you to tell a widget that it should fill the containing area in either the X or Y dimension (or BOTH), as well as expand in size if the window is enlarged by setting the named parameter expand to True with an “expand=True” argument. Note how the left button in the example code is set to fill BOTH the X and Y dimensions as well as having expand set to True. When the window is enlarged, the bottom button stays at the bottom, and the right button remains the same size on the right, but the left button expands to fill both X and Y dimensions.
Using Frames to Organize Widgets
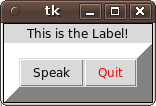
This small program has two buttons and a label. The two buttons are inside of an inner frame that has a 15 pixel wide “raised” border. The inner frame and the label are inside of the main (outer) frame, which has a 1 pixel wide “solid” border. If you pull the corner of the window a bit to make it larger, you can more easily see the one pixel solid border:
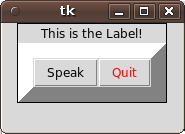
Here is the code that constructed the GUI above. Note the places where we have instructed the pack method to place certain elements in particular locations (side=TOP). Play around with these to understand how we are using the two frames to organize the widgets. Make the label move to the left of the buttons, make the buttons swap their positions! Make the buttons stack vertically instead of horizontally.
You can read more about the frame widget here.
(Download frame_example.py )
1 2 3 4 5 6 7 8 9 10 11 12 13 14 15 16 17 18 19 20 21 22 23 24 25 26 27 28 29 30 31 32 33 34 35 36 37 38 39 40 | from tkinter import *
rootWin = Tk()
#Main frame, with a thin solid border
frame = Frame(rootWin, borderwidth=1, relief="solid")
frame.pack()
#Put the label in the main frame
label = Label(frame,text="This is the Label!")
label.pack() #Try side=LEFT as a parameter!
#Inner frame, with a very thick "raised" border.
frame2 = Frame(frame, borderwidth=15,relief="raised")
frame2.pack()
#Does not actually quit the program, instead it just
#prints a message!
def quitFunc():
print("Quit button pressed!")
#The speakFunc just prints a message!
def speakFunc():
print("Say hi!")
#These two buttons are inside the "inner" frame.
#foreground (fg) color of red, displays the text "Quit",
# and will call the quitFunc when it is clicked.
button1 = Button(frame2, text="Quit", fg="red", command=quitFunc)
button1.pack(side=RIGHT) #Try TOP/BOTTOM/LEFT...
#Create another button, displaying the text "Speak" and programmed
#to call the speakFunc when it is clicked.
button2 = Button(frame2, text="Speak", command=speakFunc)
button2.pack(side=LEFT)
rootWin.mainloop() #Run the main loop.
|
The Grid Layout Manager
The pack layout manager will work for many gui’s, and can be very powerful when combined with multiple subframes containing widgets. However, if you want more detailed control over where every widget resides in your window, you may want to use the grid layout manager instead. The grid layout manager allows you to specify the row and column coordinate of each widget in a grid layout, with row zero, column zero being located in the upper left corner of your window.
If you want a widget to be extra wide (or extra tall) it can be set to “span” multiple columns or rows. You can add extra blank space around a widget using padding in the X or Y axis. You can also cause a widget to “stick” to one or more sides of it’s “grid square” for justification purposes or to make sure the widget expands to fill the entire area.

In this example, the entry starts at row 0 column 0, and spans two columns. It also has 5 pixels of padding before and after it in both the X and Y dimensions. The load/save buttons each occupy one grid space, in columns 0 and 1 respectively of row 1, below the entry. The load button is justified right by making it stick to the “east” side of its grid space, while the save button is justified left by making it stick to the “west” side of its grid space. The execute button spans two rows, and is forced to expand in both the X and Y dimensions by sticking it to all four sides of it’s grid container.
(Download gridDemo.py )
1 2 3 4 5 6 7 8 9 10 11 12 13 14 15 16 17 | from tkinter import *
w = Tk()
e = Entry(w)
e.grid(row=0,column=0, columnspan=2, pady=5, padx=5)
b1 = Button(w, text="Load")
b1.grid(row=1, column=0, sticky=E)
b2 = Button(w,text="Save")
b2.grid(row=1, column=1, sticky=W)
b3 = Button(w, text="Execute!")
b3.grid(row=0,column=2, rowspan=2, sticky=NSEW)
w.mainloop()
|
Dialog windows
TkInter includes several “pre-built” dialog or “pop-up” windows that can be used to present the user with simple error messages, informational displays, a simple yes/no or Ok/Cancel type choice, or even to select a file name to open.
These dialogs “pop-up” over your main window(s) and return a result depending upon how the user interacts with them. Although you could create your own dialogs using a new Toplevel window, it is generally easier to use the pre-built ones that tkinter provides for simple dialogs.
Info and Question Dialogs
You can use the messagebox utility module (located within the tkinter module) to help you easily display simple dialog boxes such as error or warning messages, or simple “Yes/No” or “OK/Cancel” type dialogs. For example, the following code will show a warning message with an OK button to dismiss it.
from tkinter import messagebox
messagebox.showwarning("Invalid Move", "I'm sorry, that move is not valid!")
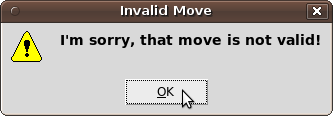
This code will ask a question (Yes/No”) and return true or false depending upon which button the user pressed.
from tkinter import messagebox
result = messagebox.askyesno("Continue?", "Do you wish to delete this document?")
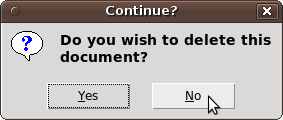
Messagebox has many utility functions, and they all follow the same general parameter format: messagebox.function_name( title, message [, options])
Other function names include: showinfo, showwarning, showerror, askquestion, askokcancel, askyesno, or askretrycancel
Tkinter also has a built in color chooser dialog.
from tkinter import colorchooser
color = colorchooser.askcolor()
File Dialogs
If you want to prompt the user to enter the location of a file to process, Tkinter has a set of built in file selection dialogs you can use. Here is an example of using the “askopenfilename” dialog:
1 2 3 4 5 6 7 8 9 | from tkinter import *
#Hide the main tk window, just show the dialog...
root = Tk()
root.withdraw()
#Just show the file dialog!
fileName = filedialog.askopenfilename()
print(fileName)
|
Other useful file dialogs are named: asksaveasfilename and askdirectory.
Using Objects for GUI programs
Because GUI’s typically have many widgets such as labels, text entry areas, buttons, check-boxes, etc, it is best to encapsulate your GUI in an object. The object allows you to keep all of the graphical elements and the functions that they call when the user interacts with them in one place. In more advanced programs, your GUI object may interact with other objects that abstract away details about your database or file system. In this chapter we will be focusing on only single objects that deal with the GUI.
This code example creates an object that must be passed a root window when it is instantiated. At the very bottom of the listing is the code that creates the main window and the object:
(Download guiObject.py )
1 2 3 4 5 6 7 8 9 10 11 12 13 14 15 16 17 18 19 20 21 22 23 24 25 | # guiObject.py
from tkinter import *
class AWindowDemo:
def __init__(self, rootWin):
#Create a button to put in the root window!
self.button = Button(rootWin, text="Click Me!", command= self.doit)
self.button.pack()
self.ourRoot = rootWin #Save a reference to the rootWin
#which will be used by the doit method!
def doit(self):
print("Button was clicked!")
self.button.config(fg="red") #Change the button!
l = Label(self.ourRoot, text="You clicked!")
l.pack()
#Create the main root window, instantiate the object, and run the main loop!
rootWin = Tk()
app = AWindowDemo( rootWin )
rootWin.mainloop()
|
Note that EVERY time you click the button a new label is added to the window. If you click a lot, the window can get quite packed! Also note that because we are not using a frame to store the button/label, they are oriented vertically.
Also note how on lines 5 and 9 we save references as object variables to the newly created button and the root window. These object variables are used by the doit function (on lines 15 and 16) to refer to these objects, changing the button’s foreground text color to red, and adding the label to the root window. This is an example of using an object to encapsulate and provide easy access to the data used by the GUI at different times (object/window creation, and when a button is later clicked by the user).
Single Line Text Entry
Many times you will want to gather one piece of information from the user, such as a name, or number. The “Entry” widget allows you to display or read a line of text using a single font.
Here is an example class that organizes an entry widget and button such that when you click the button it displays what is typed in the entry widget. Note the use of the .delete, .insert, and .get methods on the entry object to clear the entry of any pre-existing text (unneeded in this example), insert some new text, and then read the text when the user clicks the button.
For more information on the Entry widget, read more about entry widgets here.
(Download entry_example.py )
1 2 3 4 5 6 7 8 9 10 11 12 13 14 15 16 17 18 19 20 21 22 23 24 25 26 27 | # entry_example.py
from tkinter import *
class EntryDemo:
def __init__(self, rootWin):
#Create a entry and button to put in the root window!
self.entry = Entry(rootWin)
#Add some text:
self.entry.delete(0,END)
self.entry.insert(0, "Change this text!")
self.entry.pack()
self.button = Button(rootWin, text="Click Me!", command=self.clicked)
self.button.pack()
def clicked(self):
print("Button was clicked!")
eText = self.entry.get()
print("The Entry has the following text in it:", eText)
#Create the main root window, instantiate the object, and run the main loop!
rootWin = Tk()
app = EntryDemo( rootWin )
rootWin.mainloop()
|
Typically when you add an Entry to your GUI you want the user to be able to edit the text. However, you can also set up an Entry Widget with a state of “readonly” so that the program can put text into the widget, and the user can see (and even copy) the text, but not edit it. Other times, you may want to disable a text entry box entirely until you are ready for the user to enter that particular field of data. In both cases, you can set the state by using the config method. For example, self.entry.config( state = “readonly”) or self.entry.config( state=DISABLED). You can also set the state to NORMAL when your program is again ready to accept input.
Linking StringVars to Entry widgets
The Entry widget is easy enough to use. You can call the .get() method to get a string representing the text in the entry, or call the .delete() and .insert() methods to remove the current text and add more.
However, there is another way to get and set text in an Entry. You can create a StringVar object which can be linked to an Entry widget. (See line 12 in the code example below for an example of using the textvariable parameter when creating an Entry to link it with a StringVar.) A StringVar is a “Variable Wrapper” or an “active” variable designed to link with GUI elements. When the GUI element changes, the active variable also changes. An IntVar is another type of “active” variable that we will use with radio buttons below.
If a user changes the text in the Entry widget, the text in the StringVar automatically changes. If you change the text in the StringVar variable (by calling the .set() method) it will automatically update the text in the Entry. (Even if the Entry has its state set to “readonly” or DISABLED.)
Here is an example class that organizes an entry widget and button such that when you click the button it displays what is typed in the entry widget and then changes the text. Note the use of the .set() and .get() on the sv variable instead of on the Entry widget.
For more information on StringVar and other Variable Wrappers such as IntVar, you can read about Variable Wrappers here.
(Download stringvar_example.py )
1 2 3 4 5 6 7 8 9 10 11 12 13 14 15 16 17 18 19 20 21 22 23 24 25 26 27 28 29 30 31 32 33 34 35 | #stringvar_example.py
from tkinter import *
class StringVarDemo:
def __init__(self, rootWin):
#A StringVar is a special object that holds strings and
#can be linked to a GUI element such as an Entry.
self.sv = StringVar()
#Create a entry and button to put in the root window!
self.entry = Entry(rootWin, textvariable=self.sv)
self.entry.pack()
#Add some text:
self.sv.set("Here is some text!")
self.button = Button(rootWin, text="Click Me!", command=self.clicked)
self.button.pack()
def clicked(self):
print("Button was clicked!")
eText = self.sv.get()
print("The Entry had the following text in it:", eText)
self.sv.set("You clicked!")
#Create the main root window, instantiate the object, and run the main loop!
rootWin = Tk()
app = StringVarDemo( rootWin )
rootWin.mainloop()
|
Using IntVars with Radio Buttons
Radio buttons are like checkboxes, except that they are typically placed in mutually exclusive groups. This means that only one radio button in a group can be selected at any point in time. If you select one, it deselects the other radio buttons in the group. Visually, they are round instead of square like a check box.

In this example, we have two groups of radio buttons (The numbers One, Two, Three) and the colors (Green, Red). We have visually separated these two groups by using frames. This visual separation is for the user, and does not tell the computer which radio buttons are in which group. For this, we use two active variables (An IntVar for the numbers, and a StringVar for the colors). For the numbers, on lines 9-11 we set each radio button to use the self.v IntVar variable (created on line 5) with a different value. To indicate which radio button we want to be initially selected, we set self.v to the number 1 on line 16.
The second group (created in lines 24-25) uses a StringVar, and each radio button has a string value (“r” or “g”). Note that the string values are different from the labels (“Red” and “Green”) that are displayed by the radio buttons. Any time you want to figure out which radio button is selected, you can simply look at the value of the associated active variable (see lines 37-38 for a demo).
(Download rbdemo.py )
Here is the code:
1 2 3 4 5 6 7 8 9 10 11 12 13 14 15 16 17 18 19 20 21 22 23 24 25 26 27 28 29 30 31 32 33 34 35 36 37 38 39 40 41 42 43 44 | from tkinter import *
class RBDemo:
def __init__(self, win):
self.v = IntVar()
#Put the first group of radio buttons in their own frame.
f1 = Frame(win, borderwidth=3, relief=RAISED)
rb1 = Radiobutton(f1, text="One", variable=self.v, value=1)
rb2 = Radiobutton(f1, text="Two", variable=self.v, value=2)
rb3 = Radiobutton(f1, text="Three", variable=self.v, value=3)
rb1.pack(anchor=W); rb2.pack(anchor=W); rb3.pack(anchor=W)
f1.pack(side=LEFT)
#Button one will be selected by default
self.v.set(1)
#Make a second group of radiobuttons in their own frame.
#The "r" value is default. (Button with "Red" label)
self.v2 = StringVar()
f2 = Frame(win, borderwidth=2, relief=SOLID)
rb4 = Radiobutton(f2, text="Green", variable=self.v2, value="g")
rb5 = Radiobutton(f2, text="Red", variable=self.v2, value="r")
rb4.pack(anchor=W); rb5.pack(anchor=W)
f2.pack(side=RIGHT)
self.v2.set("r")
#Make a button that prints what each value is when clicked
b = Button(win, text="try it!", command=self.clicked)
b.pack(side=BOTTOM, fill=BOTH, expand=1)
def clicked(self):
print("button clicked!")
print("v is:", self.v.get())
print("v2 is:", self.v2.get() )
mw = Tk()
app = RBDemo(mw)
mw.mainloop()
|
Adding images to your GUI
The tkinter PhotoImage object can be used to show a GIF image on your GUI such as this one:

(Download cg.gif )
Note that some images which display correctly in a web browser (such as some animated gif’s) are not able to be loaded by the PhotoImage object in tkinter. The cg.gif file above will definitely work, so try your code using it to test if the problem is with your code or if the problem is with the image you are using.
Here is a simple example which creates a label that has a photo instead of text:
1 2 3 4 5 6 | from tkinter import *
win = Tk()
photo = PhotoImage(file="cg.gif")
l = Label(win, image=photo)
l.pack()
win.mainloop()
|
In addition to Labels, you can also add a PhotoImage to buttons (to make a photo button) or display them on canvases. One very important thing to know about PhotoImage objects is that they are holding the entire image data in memory. Because images can take up a lot of memory, the Python garbage collector tries to free the image data stored in a PhotoImage, even if the photo image is being used by a label or button on your GUI! In the example above, the variable created on line 3 (photo) holds a reference to our PhotoImage object, so the python garbage collector won’t free the memory. If you want to use a PhotoImage within an object, it is important to store a reference to it in something other than a local variable that will disappear as soon as the __init__ function is done. For example, the following code will run, but will NOT display a photo!
1 2 3 4 5 6 7 8 9 10 11 12 13 14 15 16 17 | #This example demonstrates an error!
#The photo will not show up because the photo
#local variable in the __init__ method is lost once the
#init method finishes running!
from tkinter import *
class MissingImage:
def __init__(self, win):
photo = PhotoImage(file="cg.gif")
l = Label(win, image=photo)
l.pack()
mw = Tk()
app = MissingImage(mw)
mw.mainloop()
|
The correct way to implement this is to make photo an object variable. You can make it an object variable of the main application object (MissingImage) or you can just add it as an object variable of the label (l) as below:
1 2 3 4 5 6 7 8 9 10 11 12 13 | from tkinter import *
class VisibleImage:
def __init__(self, win):
photo = PhotoImage(file="cg.gif")
l = Label(win, image=photo)
l.photo = photo
l.pack()
mw = Tk()
app = VisibleImage(mw)
mw.mainloop()
|
A final advanced topic is to combine urllib and the PhotoImage to download the data for an image directly from the Internet using a URL. This code uses the base64 encoding module to convert the raw bytes of an image into a format that the PhotoImage class can interpret and display. Note that on lines 6-8 we download the data from a GIF file as you would expect using the urllib module. Then, in lines 9 and 10 we convert the raw bytes into base64 encoded data, which is the format expected by the data named parameter of the PhotoImage constructor (called on line 12). Also note that we make the variable holding the photo image (self.photo) an object variable, so that it persists after our __init__ method is :
1 2 3 4 5 6 7 8 9 10 11 12 13 14 15 16 17 18 19 20 | from tkinter import *
import urllib.request
class DownloadImage:
def __init__(self, win):
url = "http://www.summet.com/dmsi/html/_images/cg.gif"
response = urllib.request.urlopen(url)
myPicture = response.read()
import base64
b64_data = base64.encodebytes(myPicture)
self.photo = PhotoImage(data=b64_data)
l = Label(win, image=self.photo)
l.pack()
mw = Tk()
app = DownloadImage(mw)
mw.mainloop()
|
Binding methods/functions to user interface events
So far we have been getting notified of user actions on GUI widgets like buttons by registering a callback function to the button using the “command” option. When the button is clicked, the function is called. By using the “bind()” method on a widget, you can bind a callback function to many different types of user input. For example, you can detect when a user is moving their mouse “over” a button, as opposed to when they click on it. The example below binds the mouseMotion() callback to the button widget (line 13). Every time the user moves the mouse “<Motion>” over the button, the callback method (lines 20-26) gets called and has an event object passed to it. The event object contains the x and y location of the mouse cursor (relative to the widget) along with other information such as the identity of the widget that triggered/processed the event. We use this information to change the text displayed on the button to reflect the x,y coordinate of the mouse pointer when it is hovering over the button (lines 25-26).

You can read more about all of the different events (such as mouse button clicks, drags with a mouse button down, keyboard events, etc) at the events and bindings page here.
Download the buttonHover example.
1 2 3 4 5 6 7 8 9 10 11 12 13 14 15 16 17 18 19 20 21 22 23 24 25 26 27 28 29 30 31 32 33 34 35 36 37 38 39 40 | # buttonHover.py
from tkinter import *
class BHDemo:
def __init__(self, rootWin):
#Create a button to put in the root window!
#Attach the "doit" method to the buttons "command" option so that
#the doit method will be called when the button is clicked.
self.button = Button(rootWin, text="Click Me!", command= self.doit)
#Bind the mouseMotion function to the "<Motion>" event for the
#button:
self.button.bind("<Motion>", self.mouseMotion)
self.button.pack()
self.ourRoot = rootWin #Save a reference to the rootWin
#which will be used by the doit method!
#This method gets called when mouse motion is detected over the button!
def mouseMotion(self,event):
x = event.x
y = event.y
#Make a string containing the "motion" event location
# and set the button's display text to that string.
coordStr = str( (x,y) )
self.button.config(text=coordStr)
#This method gets called when the button is clicked!
def doit(self):
print("Button was clicked!")
self.button.config(fg="red") #Change the button!
l = Label(self.ourRoot, text="You clicked!")
l.pack()
#Create the main root window, instantiate the object, and run the main loop!
rootWin = Tk()
app = BHDemo( rootWin )
rootWin.mainloop()
|
Switching Between Multiple Windows
Sometimes you want a program with more than a single window. For example, you may want the user to log in before they see the main window. You can create windows other than the tkinter main window by using the Toplevel widget, which simply creates a Toplevel window that will exist as long as your main window exists. Windows have a method named .withdraw() which makes them “disappear” from the screen (become invisible) without actually destroying them. Later on you can call the .deiconify() method to make the window re-appear.
Download the twoWindows example.
1 2 3 4 5 6 7 8 9 10 11 12 13 14 15 16 17 18 19 20 21 22 23 24 25 26 27 28 29 30 31 32 33 34 35 36 37 38 39 40 41 42 43 | from tkinter import *
class WinDos:
def __init__(self,mainWin):
self.mainWin = mainWin
Label(self.mainWin, text="Main Window").pack()
b1 = Button(self.mainWin, text="switch to 2nd window", command=self.win2up)
b1.pack()
self.secondWin = Toplevel()
Label(self.secondWin, text="SecondWin").pack()
b2 = Button(self.secondWin, text="Switch to first window!", command=self.win1up)
b2.pack()
self.secondWin.withdraw() # Hide this window until we need it!
self.secondWin.protocol("WM_DELETE_WINDOW", self.endProgram)
def endProgram(self):
print("end program called!")
self.mainWin.destroy()
def win1up(self):
print("Switching to window 1!")
self.secondWin.withdraw()
self.mainWin.deiconify()
def win2up(self):
print("Switching to window 2!")
self.mainWin.withdraw()
self.secondWin.deiconify()
mw = Tk()
myApp = WinDos(mw)
mw.mainloop()
print("All done!")
|
Note how the __init__ method creates both windows, but hides the second one (line 20). The win1up method (lines 28-31) hides the second window and deiconfiy’s (shows) the main window. The win2up method (lines 33-36) hides the mainWin and shows the second window.
Finally, we have to do extra work to enable the user to close the entire program (mainloop in line 42) when closing a Toplevel window. By default, closing the main Tk window (the mainWin) by clicking on the “X” in the window bar will automatically stop the mainloop and continue on to line 43 (printing “All done!”). However, closing a Toplevel window with the “X” in the window bar will NOT stop the mainloop unless you call the .destroy() method on the main window (as in line 26). To get around this, we bind the endProgram method (lines 24-26) to the window manager delete window event on the Toplevel window in line 21. Then, if the user closes the “SecondWin” by clicking the X, the endProgram method will be called and the main window will also be destroyed, ending the mainloop and the program as a whole.
Scrolling any window
Sometimes you want to display more information than will fit in a single screen. The TkInter GUI toolkit supports adding scrollbars to some widgets directly, but in some cases you want to scroll arbitrary sets of widgets or the contents of an entire window. You can do this, but it involves adding scrollbars to a canvas widget, and then adding a frame (that contains what you want to scroll) to the canvas widget using the .create_window method.
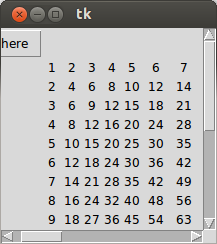
The code below demonstrates a several tricky things you have to get right before it will work the way you want it to.
Download the scrollbarExample code.
1 2 3 4 5 6 7 8 9 10 11 12 13 14 15 16 17 18 19 20 21 22 23 24 25 26 27 28 29 30 31 32 33 34 35 36 37 38 39 40 41 42 43 44 45 46 47 48 49 50 51 52 53 54 55 56 57 | from tkinter import *
root = Tk()
#Add a canvas to the window
canvas = Canvas(root,width=200, height=200)
canvas.grid(column=0, row=0, sticky=N+S+E+W)
#Allow the canvas (in row/column 0,0)
#to "grow" to fill the entire window.
root.grid_rowconfigure(0, weight=1)
root.grid_columnconfigure(0, weight=1)
#Add a scrollbar that will scroll the canvas vertically
vscrollbar = Scrollbar(root)
vscrollbar.grid(column=1, row=0, sticky=N+S)
#Link the scrollbar to the canvas
canvas.config(yscrollcommand=vscrollbar.set)
vscrollbar.config(command=canvas.yview)
#Add a scrollbar that will scroll the canvas horizontally
hscrollbar = Scrollbar(root, orient=HORIZONTAL)
hscrollbar.grid(column=0, row=1, sticky=E+W)
canvas.config(xscrollcommand=hscrollbar.set)
hscrollbar.config(command=canvas.xview)
#This frame must be defined as a child of the canvas,
#even though we later add it as a window to the canvas
f = Frame(canvas)
#Create a button in the frame.
b = Button(f,text="hi there")
b.grid(row=0, column=0)
#Add a large grid of sample label widgets to fill the space
for x in range(1,30):
for y in range(1,20):
Label(f, text=str(x*y)).grid(row=1+y, column=x)
#Add the frame to the canvas
canvas.create_window((0,0), anchor=NW, window=f)
#IMPORTANT:
f.update_idletasks() #REQUIRED: For f.bbox() below to work!
#Tell the canvas how big of a region it should scroll
canvas.config(scrollregion= f.bbox("all") )
mainloop() #Wait for user events!
|
Things to notice about the scrollbarExample code include:
- Lines 12-13 allow the row/column (0,0) where the canvas is located to grow, which means that it will expand to fill the window if the user expands the window. Also required, line 8 has the canvas “sticky=N+S+E+W” which makes the canvas expand to fit the grid space as the grid space grows.
- Lines 17-21 and 25-28 create the vertical and horizontal scrollbar, place them next to the canvas, and “crosslink” the canvas and scrollbars so that when the thumb on the scrollbar is moved the canvas will scroll.
- Lines 34-44 create the frame that holds the “content” and adds a button and a grid of labels to it.
- Line 47 actually places the frame “on” the canvas.
- Because we do not know how big the frame is, the canvas does not know how big its “scrollregion” should be. The frame’s geometry manager (grid) can calculate the frame’s size, but it doesn’t do it until we call the .update_ideltasks method on line 51. If we fail to call this, the call to f.bbox(“all”) on line 54 would return a size zero bounding box, and the scrollbars would not work correctly.
Tic-Tac-Toe Game Example
This example puts several GUI features we have talked about together into an (almost) working game of Tic-Tac-Toe. Although the computer does make moves, it isn’t very smart about it, and we don’t actually check to see if the user or the computer has won.
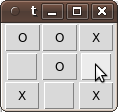
Download the Tic-Tac-Toe game.
1 2 3 4 5 6 7 8 9 10 11 12 13 14 15 16 17 18 19 20 21 22 23 24 25 26 27 28 29 30 31 32 33 34 35 36 37 38 39 40 41 42 43 44 45 46 47 48 49 50 51 52 53 54 55 56 57 58 59 60 61 62 63 64 65 66 67 68 69 70 71 72 73 74 75 76 77 78 79 80 81 82 83 84 85 86 87 88 89 90 91 92 93 94 95 96 97 98 99 100 101 102 103 104 105 106 107 108 109 110 111 112 113 114 115 116 117 118 119 120 121 122 123 124 125 126 127 128 129 130 131 132 133 134 135 136 137 138 139 140 141 142 143 144 145 146 | # Simple Tic-Tac-Toe example
#
from tkinter import *
#We define a TTT class here:
class TTT():
# It has an object variable called "board" that remembers
# who has made what moves. We use a 9 element long 1D data structure
# to make calculations easier. On-Screen, it's represented with a 3x3
# grid.
board = [ " ", " ", " ", " ", " ", " ", " ", " ", " "]
#This is the constructor. It draws the window with the 9 buttons.
def __init__(self, tkMainWin):
frame = Frame(tkMainWin)
frame.pack()
self.B00 = Button(frame)
self.B00.bind("<ButtonRelease-1>", self.clicked)
self.B00.grid(row=0,column=0)
self.B01 = Button(frame)
self.B01.bind("<ButtonRelease-1>", self.clicked)
self.B01.grid(row=0, column=1)
self.B02 = Button(frame)
self.B02.bind("<ButtonRelease-1>", self.clicked)
self.B02.grid(row=0, column=2)
self.B10 = Button(frame)
self.B10.bind("<ButtonRelease-1>", self.clicked)
self.B10.grid(row=1,column=0)
self.B11 = Button(frame)
self.B11.bind("<ButtonRelease-1>", self.clicked)
self.B11.grid(row=1, column=1)
self.B12 = Button(frame)
self.B12.bind("<ButtonRelease-1>", self.clicked)
self.B12.grid(row=1, column=2)
self.B20 = Button(frame)
self.B20.bind("<ButtonRelease-1>", self.clicked)
self.B20.grid(row=2,column=0)
self.B21 = Button(frame)
self.B21.bind("<ButtonRelease-1>", self.clicked)
self.B21.grid(row=2,column=1)
self.B22 = Button(frame)
self.B22.bind("<ButtonRelease-1>", self.clicked)
self.B22.grid(row=2,column=2)
# Set the text for each of the 9 buttons.
# Initially, to all Blanks!
self.redrawBoard()
#This event handler (callback) will figure out which of the 9 buttons
#were clicked, and call the "userMove" method with that move position.
def clicked(self, event):
if event.widget == self.B00:
self.userMove(0)
if event.widget == self.B01 :
self.userMove(1)
if event.widget == self.B02 :
self.userMove(2)
if event.widget == self.B10 :
self.userMove(3)
if event.widget == self.B11:
self.userMove(4)
if event.widget == self.B12 :
self.userMove(5)
if event.widget == self.B20 :
self.userMove(6)
if event.widget == self.B21 :
self.userMove(7)
if event.widget == self.B22 :
self.userMove(8)
#When a button signals that the user has tried to make a move by
# clicking, we check to see if that move is valid. If it is, we
# need to check to see if the user has won. If they have not, we
# need to make our move, and check to see if the computer has won.
# We also redraw the board after each move.
def userMove(self, pos):
#Is this a valid move?
if self.board[pos] == " ":
#Record the players move...
self.board[pos] = "X"
#Then redraw the board!
self.redrawBoard()
#TODO: Check to see if the user won!
#Make our move!
self.computerMove()
#TODO: Check to see if the computer won!
#Then redraw the board!
self.redrawBoard()
else: #Move is NOT valid! Don't do anything!
messagebox.showwarning("Invalid Move",
"I'm sorry, that move is not valid!")
# TODO: Make our move smarter!
# This method will make a move for the computer.
# It is VERY simplistic, as it just picks the first
# valid move from an ordered list of preferred moves.
def computerMove(self):
for move in [4, 0, 2, 6, 8, 1, 3, 5, 7]:
if self.board[move] == " ":
self.board[move] = "O"
return
#This method will update the text displayed by
# each of the 9 buttons to reflect the "board"
# object variable.
def redrawBoard(self):
self.B00.config( text = self.board[0])
self.B01.config( text = self.board[1])
self.B02.config( text = self.board[2])
self.B10.config( text = self.board[3])
self.B11.config( text = self.board[4])
self.B12.config( text = self.board[5])
self.B20.config( text = self.board[6])
self.B21.config( text = self.board[7])
self.B22.config( text = self.board[8])
#This code starts up TK and creates a main window.
mainWin = Tk()
#This code creates an instance of the TTT object.
ttt = TTT( mainWin)
#This line starts the main event handling loop and sets us on our way...
mainWin.mainloop()
|
Lines 16-58 create the window with nine buttons. Note the call to self.redrawBoard() on line 58 which re-uses the code that updates the buttons text as moves are made. In this case, because the “board” variable is initialized to nine spaces (all blanks), it just sets the text of each button to a “space”. We bind to the “ButtonRelease-1” event, so that our “clicked” callback is called once the user clicks AND RELEASES a button. This allows the user to change their mind after clicking on a button by dragging the mouse outside of the button and releasing the mouse button outside of any buttons. It also prevents the button from staying “depressed” should the user trigger the “invalid move” warning dialog on line 108. (If that dialog is triggered when the button is down, some user events get lost, and the button stays down!)
The clicked method (lines 62-80) checks to see which button was clicked and then asks to make the appropriate move by calling the userMove method. The userMove method (lines 87-109) contains most of the “game logic”, determining if a move is valid (nobody is on the square already) and picking a move for the computer with the computerMove method (lines 117-121).
This code creates and names nine buttons. It would conserve space in the source code to use a list to hold reference to each of the nine buttons. The code which creates an instance of the TTT class and runs the main loop is located at the bottom (lines 140-146).
The Canvas Widget
Tkinter includes many widgets we have not discussed explicitly. However, if you find that you need a widget that does not exist, you can always create your own to fill in the gap. The canvas widget is a generic drawing widget that can be used to display custom graphs or charts. You can also create new widgets using a canvas. For example, you could create a progress bar by drawing rectangles on a horizontal canvas. The canvas widget includes primitives for drawing simple geometric shapes (canvas items) such as lines, ovals, or boxes, as well as images, text, or even other windows/widgets.
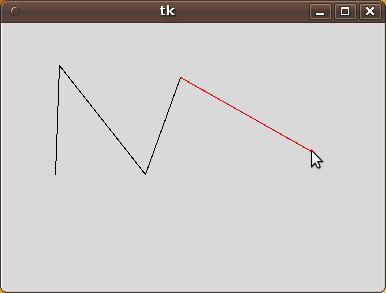
By binding to mouse events on the canvas, you can create a simple drawing application or interactive graphics such as this example drawing program. By left clicking the mouse button, you can start to drag a red “rubber-band” line that actively follows your mouse as it moves around. Left click again to fix the line and turn it black. Right-Click to delete the last line drawn.
Download the simple canvas example.
1 2 3 4 5 6 7 8 9 10 11 12 13 14 15 16 17 18 19 20 21 22 23 24 25 26 27 28 29 30 31 32 33 34 35 36 37 38 39 40 41 42 43 44 45 46 47 48 49 50 51 52 53 54 55 56 57 58 59 60 61 62 63 64 65 66 67 68 69 70 71 72 73 74 75 76 77 78 79 80 81 | # Simple Canvas example
#
from tkinter import *
#We define a drawing class here:
class Drawing():
#This is the constructor. It draws the window with the canvas.
def __init__(self, tkMainWin):
frame = Frame(tkMainWin)
frame.pack()
self.lines = []
self.lastX = None
self.lastY = None
self.redLine = None
self.canvas = Canvas(frame)
self.canvas.bind("<Button-1>",self.clicked)
self.canvas.bind("<Button-3>",self.rightClicked)
self.canvas.bind("<Motion>",self.mouseMoved)
self.canvas.pack()
#This event handler (callback) will draw lines, saving their ID
#in a list.
def clicked(self, event):
print("Button down!")
if self.lastX != None:
l = self.canvas.create_line(self.lastX,self.lastY,event.x,event.y)
self.lines.append(l)
self.lastX = event.x
self.lastY = event.y
pass
#This handler deals with "right-click" events, which cause the
#last line drawn to be deleted!
def rightClicked(self,event):
print("rightClicked!")
self.lastX = None
self.lastY = None
if (len( self.lines) > 0):
self.canvas.delete( self.lines[-1])
del self.lines[-1] #Need to keep our data structure in
#sync with the canvas
#Manage the red line!
if self.redLine != None:
self.canvas.delete(self.redLine)
self.redLine = None
#This handler deals with "mouse motion" events, and draws a red
# "rubber-band" line illustrating where the next line will be
# drawn if the user clicks now...
def mouseMoved(self, event):
print("Mouse Moved!")
if self.lastX != None:
if self.redLine != None:
self.canvas.delete(self.redLine);
self.redLine = self.canvas.create_line(self.lastX, self.lastY,
event.x, event.y, fill="red")
#This code starts up TK and creates a main window.
mainWin = Tk()
#This code creates an instance of the TTT object.
ttt = Drawing( mainWin)
#This line starts the main event handling loop and sets us on our way...
mainWin.mainloop()
|
In this example program, we add a canvas to the frame and bind three callback functions to mouse clicks (left/right) and motion on the canvas (lines 19-23). When the left mouse button is clicked, the “clicked” function (line 31) gets called. It records where the line starts in the lastX and lastY variables (lines 39-40). The mouseMoved method (line 62) draws a red “rubber-band” line from the last mouse click to the current location of the mouse every time the mouse moves (lines 68-69). It will delete the last red line (if one exists) before drawing the next one (lines 66-67).
When you click the left mouse button a second time, lines 35-37 create a black line from the last click point to the current click point and save it’s ID in the self.lines list.
If you right click, the “rightClicked” method will delete the last black line (if self.lines is not empty) and get rid of any left-over red “rubber-band” lines.
You can learn more about the canvas widget here.
Exercises
Which of the following lines of code would produce a Button called ‘Push’ that calls the clicker function when the user clicks it?
self.b = Button(main, text = "Push", command = self.clicker() )
self.b = Button(main, "Push", command = self.clicker )
self.b = Butotn(main, text="Push", command = self.clicker )
Which of the following lines of code would delete all text from an Entry?
self.entry.delete(0:)
self.entry.delete(:END)
self.entry.delete(0,END)
Which of the following lines of code packs a button correctly?
button.pack(side=RIGHT)
button.pack(sticky=E)
button.pack(sticky=LEFT)
Draw the GUI produced by this python code. What will print out in the IDLE shell when you click each button?
 1
 2
 3
 4
 5
 6
 7
 8
 9
10
11
12
13
14
15
from tkinter import *
class GUI:
    def __init__(self,mw):
        self.mw = mw
        Label(text= "Pick A Button").grid(row=0, columnspan=2)
        Button(text= "CLICK ME!", command = self.clicked1).grid(row=1,column=0)
        Button(text= "Win a Prize!", command = self.clicked2).grid(row=1, column=1)
    def clicked1(self):
        print("You clicked the wrong button! Now you dont win a prize.")
    def clicked2(self):
        print("Congratulations! You won a 2012 Ford Mustang!")

root = Tk()
app = GUI(root)
root.mainloop()
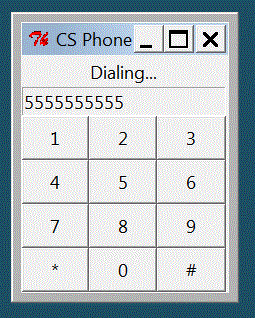
Write a program that looks like the number pad for a phone. When the user clicks on a number it is added to the (read-only) entry at the top of the program. (Your program will not actually do anything with this number….You can enhance the program by adding a button that allows the user to clear the number display entry and start over.)
5. Write a program called MoneyConverter that will allow the user to convert a number of US Dollars (entered as text by the user) to a value in Euros. The program will do the conversion and display the result in another (read-only) text entry field when the user presses the button. To get things working, you can hard-code in any exchange rate you want. Once you know how to download information from a website, you may want to enhance this program to download the current exchange rate from a website such as
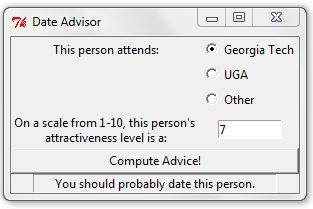
(RadioButtons, Entry Boxes, Labels) You will be creating a GUI that gives dating advice. The user will enter their potential mate’s school and attractiveness level, and the GUI will respond with whether or not the user should date that person. Your code should be made up of 3 functions: an __init__ funciton, which creates the GUI; a checkValid function, which is called by the button, and makes sure the user has selected a school and has entered a valid attractiveness level; and a computeAdvice function, which will use my proven algorithm to give advice. This algorithm will place a person into one of three categories based on his/her overall score. The total score is calculated as follows:
Every person starts off with 0 points.
If the person goes to Georgia Tech, he/she receives 3 points.
It the person goes to UGA, he/she loses 3 points.
If the person goes to another school, he/ she receives 0 points.
The points he/she receives based on what school they go to are then added to their attractiveness level (which is measured on a scale of 1-10) to create a total score.
- If a person has a total score of more than 10, you should output: You should definitely date this person!
- If a person has a total score between 7 and 10 inclusive, you should output: You should probably date this person.
- If a person has a total score of less than 7, you should output: You should definitely not date this person!
GUI Specifics:
- Top, normal state entry box has width 10
- Bottom, read only state entry box has width 40
- The bottom entry box should update when different criteria are chosen after the button is pressed.
- The output statement will be center justified in an entry field below the “Compute Attractiveness” button.
Create a GUI that contains two buttons labeled “Select File” and “Calculate GPA” and three text entries. The Select File button will use the askopen file dialog to ask for the name of a csv file. It will then read in a valid file and list the names of each of the students in the file. Then, the user can choose one of those students by typing in the name in the second entry. After that is done, clicking the calculate GPA button will calculate the GPA for that particular student and put it in the third entry box. The first and third entry boxes (the one with the names and the one with the gpa respectively) should be readonly. Note that there is at least one grade per student but there can be different numbers of grades for each student. To calculate the gpa, simply sum the scores and divide by the number of scores. You can download a sample file abc.csv ), but feel free to make your own sample data. The format of each line in the txt file will always be
name,grade1,grade2,grade3, etc...

